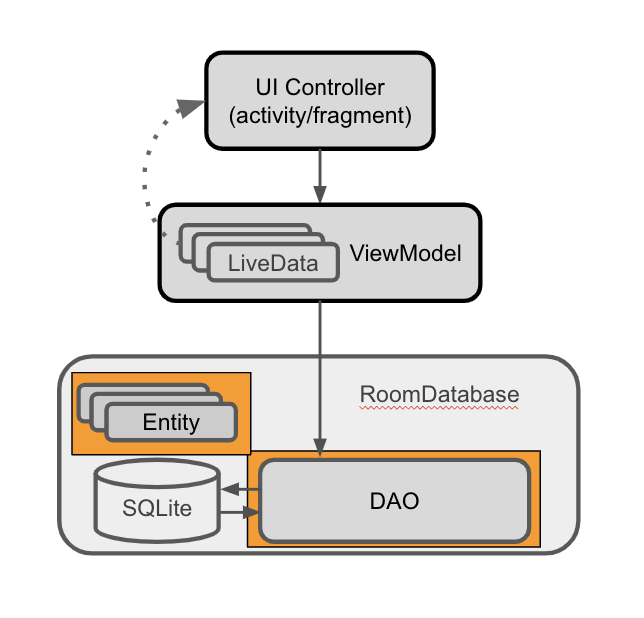
Lesson 06: App Architecture (Persistence)
This lesson is all about data persistence, there are many ways to storing data permanently, but with Room things have become even easier than ever before! We will be building Track My Sleep Quality app.
Most apps have data that needs to be kept, even after the user closes the app. For example, the app might store a playlist, an inventory of game items, records of expenses and income, a catalog of constellations, or sleep data over time. Commonly, you would use a database to store persistent data.Most apps have data that needs to be kept, even after the user closes the app. For example, the app might store a playlist, an inventory of game items, records of expenses and income, a catalog of constellations, or sleep data over time. Commonly, you would use a database to store persistent data.
Tour of the App
- The app will show the UI for the
SleepTrackerFragment, but no data, and the buttons do not respond to clicks. - Notice the provided dependencies in module gradle filefor all the Android Jetpack libraries, including Room, and the dependencies for coroutines.
// Room and Lifecycle dependencies
implementation "androidx.room:room-runtime:$version_room"
kapt "androidx.room:room-compiler:$version_room"
implementation "androidx.lifecycle:lifecycle-extensions:$version_lifecycle_extensions"

// Coroutines
implementation "org.jetbrains.kotlinx:kotlinx-coroutines-core:$version_coroutine"
implementation "org.jetbrains.kotlinx:kotlinx-coroutines-android:$version_coroutine"

// Kotlin Extensions and Coroutines support for Room
implementation "androidx.room:room-ktx:$version_room"- The app is structured by functionality. There is one package for all database code. In the starter app, it contains a placeholder file for defining sleep data.
- The
sleepqualityandsleeptrackerpackages contain the provided fragments, and you will add most of your code in those two packages. - The
Util.ktfile contains functions to help display sleep quality data. Some code is commented out because it references aViewModel, which you will create later. - androidTest folder/SleepDatabaseTest.kt will be used to verify that the database is working as intended.
SQL
This course assumes that you are familiar with databases in general, SQL databases in particular, and the SQL language used to interact with them. This page is a refresher and quick reference about SQLite.
Designing Entities
In Android, data is represented in data classes, and the data is accessed and modified using function calls. However, in the database world, you need entities and queries.
Entity:
- An entity represents an object or concept, and its properties, to store in the database. An entity class defines a table, and each instance of that class represents a row in the table.
- Each property defines a column. In your app, the entity is going to hold information about a night of sleep.
Query:
- A query is a request for data or information from a database table or combination of tables, or a request to perform an action on the data.
- Common queries are for getting, inserting, and updating entities. For example, you could query for all the sleep nights on record, sorted by start time.
Room does all the hard work for you to get from Kotlin data classes to entities that can be stored in SQLite tables, and from function declarations to SQL queries.
You must define each entity as an annotated data class, and the interactions as an annotated interface, a data access object (DAO). Room uses these annotated classes to create tables in the database, and queries that act on the database.
- In the
databasepackage, find and open theSleepNight.ktfile. - Create the
SleepNightdata class with parameters for an ID, start time and end time in milliseconds, and a numerical sleep quality rating:
data class SleepNight  (
    var nightId: Long = 0L,
    val startTimeMilli: Long =  System.currentTimeMillis(),
    var endTimeMilli: Long = startTimeMilli,
    var sleepQuality: Int = -1
)
Note: currentTimeMillis method returns the current time in milliseconds. It can be formatted using SimpleDateFormat. For example:
SimpleDateFormat("EEEE MMM-dd-yyyy' Time: 'HH:mm").format(systemTime).toString()- Annotate the data class with
@Entity, and name the tabledaily_sleep_quality_table. (Remember to perform the necessary imports for this and all the following annotations.)
@Entity(tableName = "daily_sleep_quality_table")- Identify the
nightIdas the primary key by annotating it with@PrimaryKey, and set theautoGenerateparameter totrue:
@PrimaryKey(autoGenerate = true)- Annotate the remaining properties with ColumnInfo
@ColumnInfoand customize their names as shown below.
import androidx.room.ColumnInfo
import androidx.room.Entity
import androidx.room.PrimaryKey

@Entity(tableName = "daily_sleep_quality_table")
data class SleepNight(
    @PrimaryKey(autoGenerate = true)
    var nightId: Long = 0L,

    @ColumnInfo(name = "start_time_milli")
    val startTimeMilli: Long = System.currentTimeMillis(),

    @ColumnInfo(name = "end_time_milli")
    var endTimeMilli: Long = startTimeMilli,

    @ColumnInfo(name = "quality_rating")
    var sleepQuality: Int = -1
)
Data Access Object (DAO)
- When you use a
Roomdatabase, you query the database by defining and calling Kotlin functions in your code. These Kotlin functions map to SQL queries. You define those mappings in a DAO using annotations, andRoomcreates the necessary code. - Think of a DAO as defining a custom interface for accessing your database.
- For common database operations, the
Roomlibrary provides convenience annotations, such as@Insert,@Delete, and@Update. For everything else, there is the@Queryannotation. You can write any query that’s supported by SQLite. - As an added bonus, as you create your queries in Android Studio, the compiler checks your SQL queries for syntax errors.
For the sleep-tracker database of sleep nights, you need to be able to do the following:
- Insert new nights.
- Update an existing night to update an end time and a quality rating.
- Get a specific night based on its key.
- Get all nights, so you can display them.
- Get the most recent night. when we don’t have a key that matches.
- Delete all entries in the database.
Creating the SleepDatabase DAO
- In the
databasepackage, openSleepDatabaseDao.kt. Create an interfaceSleepDatabaseDaoand annotate it with@Dao.
@Dao
interface SleepDatabaseDao {}- Inside the body of the interface, add an
@Insertannotation. Below the@Insert, add aninsert()function that takes an instance of theEntityclassSleepNightas its argument.Roomwill generate all the necessary code to insert the passed-inSleepNightinto the database. Note that you can call the function anything you want.
@Insert
fun insert(night: SleepNight)- Add an
@Updateannotation with anupdate()function for oneSleepNight. The entity that’s updated is the entity that has the same key as the one that’s passed in. You can update some or all of the entity’s other properties.
@Update
fun update(night: SleepNight)- Add a
@Queryannotation with aget()function that takes aLongkeyargument and returns a nullableSleepNight. Add a parameter to@Query. Make it aStringthat is a SQLite query that selects all columns from thedaily_sleep_quality_table WHEREthenightIdmatches the:keyargument.
@Query("SELECT * from daily_sleep_quality_table WHERE nightId = :key")
fun get(key: Long): SleepNight?- Add another
@Querywith aclear()function and a SQLite query toDELETEeverything from thedaily_sleep_quality_table. This query does not delete the table itself.
@Query("DELETE FROM daily_sleep_quality_table")
fun clear()Note: The @Delete annotation deletes one item, and you could use @Delete and supply a list of nights to delete. The drawback is that you need to fetch or know what’s in the table. The @Delete annotation is great for deleting specific entries, but not efficient for clearing all entries from a table.
- Add a
@Querywith agetTonight()function. Make theSleepNightreturned bygetTonight()nullable, so that the function can handle the case where the table is empty. (The table is empty at the beginning, and after the data is cleared.)- You get tonight by writing a SQLite query that returns the first element of a list of results ordered by nightId in descending order. Use
LIMIT 1to return only one element.
- You get tonight by writing a SQLite query that returns the first element of a list of results ordered by nightId in descending order. Use
@Query("SELECT * FROM daily_sleep_quality_table ORDER BY nightId DESC LIMIT 1")
fun getTonight(): SleepNight?- Add a
@Querywith agetAllNights()function:- The SQLite query should return all columns from the
daily_sleep_quality_table, ordered in descending order. LetgetAllNights()return a list ofSleepNightasLiveData.Roomkeeps thisLiveDataupdated for us, and we don’t have to specify an observer for it. - You may need to import
LiveDatafromandroidx.lifecycle.LiveData.
- The SQLite query should return all columns from the
@Query("SELECT * FROM daily_sleep_quality_table ORDER BY nightId DESC")
fun getAllNights(): LiveData<List<SleepNight>>
Suspend functions and LiveData in DAO
Note that functions that return LiveData in the DAO can’t use suspend keyword because it will cause compile-time errors.
Creating a Room Database
You need to create an abstract database holder class, annotated with @Database. This class has one method that either creates an instance of the database if the database doesn’t exist, or returns a reference to an existing database.
Getting a Room database is a bit involved, so here’s the general process before you start with the code:
- Create a
public abstractclass thatextends RoomDatabase. This class is to act as a database holder. The class is abstract, becauseRoomcreates the implementation for you. - Annotate the class with
@Database. In the arguments, declare the entities for the database and set the version number. - Inside a companion object, define an abstract method or property that returns a
SleepDatabaseDao.Roomwill generate the body for you. - You only need one instance of the
Roomdatabase for the whole app, so make theRoomDatabasea singleton. - Use
Room’s database builder to create the database only if the database doesn’t exist. Otherwise, return the existing database.
Tip: The code will be much the same for any Room database, so you can use this code as a template.
- In the
databasepackage, openSleepDatabase.ktand create anabstractclass calledSleepDatabasethat extendsRoomDatabase.Annotate the class with@Databaseand supply theSleepNightas the only item with the list ofentities, set theversionas1, and setexportSchematofalse, so as not to keep schema version history backups. Note: Whenever you change the schema, you’ll have to increase the version number.
@Database(entities = [SleepNight::class], version = 1, exportSchema = false)
abstract class SleepDatabase : RoomDatabase() {
}- The database needs to know about the DAO. Inside the body of the class, declare an abstract value that returns the
SleepDatabaseDao. You can have multiple DAOs.
abstract val sleepDatabaseDao: SleepDatabaseDao- Below that, define a
companionobject. The companion object allows clients to access the methods for creating or getting the database without instantiating the class. Since the only purpose of this class is to provide a database, there is no reason to ever instantiate it.
companion object {}- Inside the
companionobject, declare a private nullable variableINSTANCEfor the database and initialize it tonull. TheINSTANCEvariable will keep a reference to the database, once one has been created. This helps you avoid repeatedly opening connections to the database, which is expensive.
- Annotate
INSTANCEwith@Volatile. The value of a volatile variable will never be cached, and all writes and reads will be done to and from the main memory. This helps make sure the value ofINSTANCEis always up-to-date and the same to all execution threads. It means that changes made by one thread toINSTANCEare visible to all other threads immediately, and you don’t get a situation where, say, two threads each update the same entity in a cache, which would create a problem.
@Volatile
private var INSTANCE: SleepDatabase? = null- Below
INSTANCE, still inside thecompanionobject, define agetInstance()method with aContextparameter that the database builder will need. Return a typeSleepDatabase. You’ll see an error becausegetInstance()isn’t returning anything yet.
fun getInstance(context: Context): SleepDatabase {}- Inside
getInstance(), add asynchronized{}block. Pass inthisso that you can access the context.
Note: Multiple threads can potentially ask for a database instance at the same time, resulting in two databases instead of one. This problem is not likely to happen in this sample app, but it’s possible for a more complex app. Wrapping the code to get the database into synchronized means that only one thread of execution at a time can enter this block of code, which makes sure the database only gets initialized once.
synchronized(this) {}- Inside the synchronized block, copy the current value of
INSTANCEto a local variableinstance. This is to take advantage of smart cast, which is only available to local variables.
var instance = INSTANCE- Inside the
synchronizedblock,return instanceat the end of thesynchronizedblock. Ignore the return type mismatch error; you won’t ever return null once you are done.
return instance- Above the
returnstatement, add anifstatement to check whetherinstanceis null, that is, there is no database yet. Ifinstanceisnull, use the database builder to get a database. In the body of theifstatement, invokeRoom.databaseBuilderand supply the context that you passed in, the database class, and a name for the database,sleep_history_database. To remove the error, you’ll have to add a migration strategy andbuild()in the following steps.
instance = Room.databaseBuilder(
        context.applicationContext,
        SleepDatabase::class.java,
        "sleep_history_database"
)- Add the required migration strategy to the builder. Use
.fallbackToDestructiveMigration(). Normally, you would have to provide a migration object with a migration strategy for when the schema changes. A migration object is an object that defines how you take all rows with the old schema and convert them to rows in the new schema, so that no data is lost. Migration is beyond the scope of this course. A simple solution is to destroy and rebuild the database, which means that the data is lost.
.fallbackToDestructiveMigration()- Finally, call
.build().
.build()- Assign
INSTANCE = instanceas the final step inside theifstatement.
INSTANCE = instanceYour final code should look like this:
import android.content.Context
import androidx.room.Database
import androidx.room.Room
import androidx.room.RoomDatabase

/**
 * A database that stores SleepNight information.
 * And a global method to get access to the database.
 *
 * This pattern is pretty much the same for any database,
 * so you can reuse it.
 */
@Database(entities = [SleepNight::class], version = 1, exportSchema = false)
abstract class SleepDatabase : RoomDatabase() {

    /**
     * Connects the database to the DAO.
     */
    abstract val sleepDatabaseDao: SleepDatabaseDao

    /**
     * Define a companion object, this allows us to add functions on the SleepDatabase class.
     *
     * For example, clients can call `SleepDatabase.getInstance(context)` to instantiate
     * a new SleepDatabase.
     */
    companion object {
        /**
         * INSTANCE will keep a reference to any database returned via getInstance.
         *
         * This will help us avoid repeatedly initializing the database, which is expensive.
         *
         *  The value of a volatile variable will never be cached, and all writes and
         *  reads will be done to and from the main memory. It means that changes made by one
         *  thread to shared data are visible to other threads.
         */
        @Volatile
        private var INSTANCE: SleepDatabase? = null

        /**
         * Helper function to get the database.
         *
         * If a database has already been retrieved, the previous database will be returned.
         * Otherwise, create a new database.
         *
         * This function is threadsafe, and callers should cache the result for multiple database
         * calls to avoid overhead.
         *
         * This is an example of a simple Singleton pattern that takes another Singleton as an
         * argument in Kotlin.
         *
         * To learn more about Singleton read the wikipedia article:
         * https://en.wikipedia.org/wiki/Singleton_pattern
         *
         * @param context The application context Singleton, used to get access to the filesystem.
         */
        fun getInstance(context: Context): SleepDatabase {
            // Multiple threads can ask for the database at the same time, ensure we only initialize
            // it once by using synchronized. Only one thread may enter a synchronized block at a
            // time.
            synchronized(this) {
                // Copy the current value of INSTANCE to a local variable so Kotlin can smart cast.
                // Smart cast is only available to local variables.
                var instance = INSTANCE
                // If instance is `null` make a new database instance.
                if (instance == null) {
                    instance = Room.databaseBuilder(
                            context.applicationContext,
                            SleepDatabase::class.java,
                            "sleep_history_database"
                    )
                            // Wipes and rebuilds instead of migrating if no Migration object.
                            // Migration is not part of this lesson. You can learn more about
                            // migration with Room in this blog post:
                            // https://medium.com/androiddevelopers/understanding-migrations-with-room-f01e04b07929
                            .fallbackToDestructiveMigration()
                            .build()
                    // Assign INSTANCE to the newly created database.
                    INSTANCE = instance
                }
                // Return instance; smart cast to be non-null.
                return instance
            }
        }
    }
}
You now have all the building blocks for working with your Room database. This code compiles and runs, but you have no way of telling if it actually works. So, this is a good time to add some basic tests.
Testing the Room Database
In this step, you run provided tests to verify that your database works. This helps ensure that the database works before you build onto it. The provided tests are basic. For a production app, you would exercise all of the functions and queries in all the DAOs.
The starter app contains an androidTest folder. This androidTest folder contains unit tests that involve Android instrumentation, which is a fancy way of saying that the tests need the Android framework, so you need to run the tests on a physical or virtual device. Of course, you can also create and run pure unit tests that do not involve the Android framework.
In the androidTest folder, open the SleepDatabaseTest file. Uncomment the code. Right-click on the test file in the Project view and choose Run. After the app builds and runs, verify in the SleepDatabaseTest pane that all the tests have passed.
Here’s a quick run-through of the testing code, because it’s another piece of code that you can reuse:
SleepDabaseTestis a test class.- The
@RunWithannotation identifies the test runner, which is the program that sets up and executes the tests. - During setup, the function annotated with
@Beforeis executed, and it creates an in-memorySleepDatabasewith theSleepDatabaseDao. “In-memory” means that this database is not saved on the file system and will be deleted after the tests run. - Also when building the in-memory database, the code calls another test-specific method,
allowMainThreadQueries. By default, you get an error if you try to run queries on the main thread. This method allows you to run tests on the main thread, which you should only do during testing. - In a test method annotated with
@Test, you create, insert, and retrieve aSleepNight, and assert that they are the same. If anything goes wrong, throw an exception. In a real test, you would have multiple@Testmethods. - When testing is done, the function annotated with
@Afterexecutes to close the database.
Displaying Sleep Data
Open activity_main.xml. This layout contains the nav_host_fragment.
Also, notice the merge tag. The merge tag can be used to eliminate redundant layouts when including layouts, and it’s a good idea to use it. You can find more information about it here.
<merge xmlns:android="http://schemas.android.com/apk/res/android"
    xmlns:app="http://schemas.android.com/apk/res-auto">

    <fragment
        android:id="@+id/nav_host_fragment"
        android:name="androidx.navigation.fragment.NavHostFragment"
        android:layout_width="match_parent"
        android:layout_height="match_parent"
        app:defaultNavHost="true"
        app:navGraph="@navigation/navigation" />

</merge>
Adding A ViewModel
Now that you have a database and a UI, you need to collect data, add the data to the database, and display the data. All this work is done in the view model. Your sleep-tracker view model will handle button clicks, interact with the database via the DAO, and provide data to the UI via LiveData. All database operations will have to be run away from the main UI thread, and you’ll do that using coroutines.
- In the sleeptracker package, open SleepTrackerViewModel.kt. Inspect the provided
SleepTrackerViewModelclass definition that extendsAndroidViewModel(). This class is the same asViewModel, but it takes the application context as a parameter and makes it available as a property. You are going to need this later on to access resources. TheViewModelneeds access to the data in the database, so pass in an instance of theSleepDatabaseDao. And then pass this up to the super class as well.
class SleepTrackerViewModel(
       val database: SleepDatabaseDao,
       application: Application) : AndroidViewModel(application) {
}- In the sleeptracker package, open **SleepTrackerViewModelFactory.kt.
-
The provided
SleepTrackerViewModelFactorytakes the same argument as theViewModeland extendsViewModelProvider.Factory. -
Inside the factory, the code overrides
create(), which takes any class type as an argument and returns aViewModel. -
In the body of
create(), the code checks that there is aSleepTrackerViewModelclass available, and if there is, returns an instance of it. Otherwise, the code throws an exception.
Tip: This is mostly boilerplate code, so you can reuse the code for future view-model factories.
class SleepTrackerViewModelFactory(
       private val dataSource: SleepDatabaseDao,
       private val application: Application) : ViewModelProvider.Factory {
   @Suppress("unchecked_cast")
   override fun <T : ViewModel?> create(modelClass: Class<T>): T {
       if (modelClass.isAssignableFrom(SleepTrackerViewModel::class.java)) {
           return SleepTrackerViewModel(dataSource, application) as T
       }
       throw IllegalArgumentException("Unknown ViewModel class")
   }
}- In the
SleepTrackerFragment, get a reference to the application context. Put the reference inonCreateView(), belowbinding. You need a reference to the app that this fragment is attached to, to pass into the view-model factory provider.
val application = requireNotNull(this.activity).applicationNote: The requireNotNull Kotlin function throws an IllegalArgumentException if the value is null.
- You need a reference to your data source via a reference to the DAO. In
onCreateView(), before thereturn, define adataSource. To get a reference to the DAO of the database, useSleepDatabase.getInstance(application).sleepDatabaseDao.
val dataSource = SleepDatabase.getInstance(application).sleepDatabaseDao- In
onCreateView(), before thereturn, create an instance of theviewModelFactory. You need to pass itdataSourceand theapplication. Now that you have a factory, get a reference to theSleepTrackerViewModel. TheSleepTrackerViewModel::class.javaparameter refers to the runtime Java class of this object.
val viewModelFactory = SleepTrackerViewModelFactory(dataSource, application)
val sleepTrackerViewModel = ViewModelProvider(this, viewModelFactory).get(SleepTrackerViewModel::class.java)
Your finished code should look like this:
// Create an instance of the ViewModel Factory.
val dataSource = SleepDatabase.getInstance(application).sleepDatabaseDao
val viewModelFactory = SleepTrackerViewModelFactory(dataSource, application)

// Get a reference to the ViewModel associated with this fragment.
val sleepTrackerViewModel =
       ViewModelProvider(
               this, viewModelFactory).get(SleepTrackerViewModel::class.java)
And the onCreateView() method so far should look like:
/**
    * Called when the Fragment is ready to display content to the screen.
    *
    * This function uses DataBindingUtil to inflate R.layout.fragment_sleep_quality.
    */
override fun onCreateView(inflater: LayoutInflater, container: ViewGroup?,
                            savedInstanceState: Bundle?): View {

    // Get a reference to the binding object and inflate the fragment views.
    val binding: FragmentSleepTrackerBinding = DataBindingUtil.inflate(
            inflater, R.layout.fragment_sleep_tracker, container, false)

    val application = requireNotNull(this.activity).application

    val dataSource = SleepDatabase.getInstance(application).sleepDatabaseDao

    val viewModelFactory = SleepTrackerViewModelFactory(dataSource, application)

    val sleepTrackerViewModel =
            ViewModelProvider(
                    this, viewModelFactory).get(SleepTrackerViewModel::class.java)

    return binding.root
}
Data Binding for ViewModel
With the basic ViewModel in place, you need to finish setting up data binding in the SleepTrackerFragment to connect the ViewModel with the UI.
- In
fragment_sleep_tracker.xml: Inside the<data>block, create a<variable>that references theSleepTrackerViewModelclass.
<data>
   <variable
       name="sleepTrackerViewModel"
       type="com.example.android.trackmysleepquality.sleeptracker.SleepTrackerViewModel" />
</data>- In
SleepTrackerFragment:
-
Set the current activity as the lifecycle owner of the binding. Add this code inside the
onCreateView()method, before thereturnstatement. -
Assign the
sleepTrackerViewModelbinding variable to thesleepTrackerViewModel. Put this code insideonCreateView(), below the code that creates theSleepTrackerViewModel
binding.sleepTrackerViewModel = sleepTrackerViewModel
binding.lifecycleOwner = this
Multithreading and Coroutines
To use processors more efficiently, the operating system can enable an application to create more than one thread of execution within a process.
There is a lot of infrastructure to manage all those threads needing to run, sometimes in a given order and finished to:
- Scheduler: which takes into account things such as priorities and makes sure all the threads get to run and finish.
- Dispatcher: which sets up threads, and specifies a context for that to happen in.
- Context: You can think of the context as a separate specialized reading room. Some contexts are best for user interface stuff, and some are specialized to deal with input, output operations.
A user-facing application usually has a main thread that runs in a foreground and can dispatch other threads that may run into background.
- On Android, the main thread is a single thread that handles all updates to the UI. The main thread is also the thread that calls all click handlers and other UI and life cycle callbacks.
- The UI thread is the default thread, meaning unless you explicitly switched threads or use a class that runs on a different thread, everything you do is on the main thread.
It’s essential to avoid blocking the UI thread. Blocking in this context means the UI thread is waiting, not doing anything at all for an action to be done. For example, something like a database to be done updating. Many common tasks take longer than 16 milliseconds, such as fetching data from the internet, reading a large file, or writing data to a database. Therefore, calling code like this from the main thread can cause the app to pause, stutter or even freeze.
Coroutines
Callbacks
-
One pattern for performing long-running tasks without blocking the main thread is to use callbacks. See the Multi-threading & callbacks primer for an introduction to multi-threading and callbacks.
-
By using callbacks, you can start long-running tasks on a background thread.
-
When a task completes, the callback supplied as an argument is called to inform you of the result on the main thread.
Callbacks have a few drawbacks:
- Codes that heavily uses callbacks can become hard to read and harder to reason about.
- Because while the code looks sequential, the callback code will run at some asynchronous time in the future.
- In addition, callbacks don’t allow the use of some language features, such as exceptions.
Coroutines
In Kotlin, coroutines are the way to handle long-running tasks elegantly and efficiently. Kotlin coroutines let you convert callback-based code to sequential code. Code written sequentially is typically easier to read and can even use language features such as exceptions. In the end, coroutines and callbacks do the same thing: they wait until a result is available from a long-running task and continue execution.
Coroutines have the following properties:
Coroutines are asynchronous.
- A coroutine runs independently from the main execution steps of your program.
- This could be in parallel or on a separate processor. It could also be that while the rest of the app is waiting for input, you sneak in a bit of processing.
- One of the important aspects of async is that you cannot expect that the result is available, until you explicitly wait for it.
For example, let’s say you have a question that requires research, and you ask a colleague to find the answer. They go off and work on it, which is like they’re doing the work “asynchronously” and “on a separate thread.” You can continue to do other work that doesn’t depend on the answer, until your colleague comes back and tells you what the answer is.
Coroutines are non-blocking. Non-blocking means that a coroutine does not block the main or UI thread. So with coroutines, users always have the smoothest possible experience, because the UI interaction always has priority.
Coroutines use suspend functions to make asynchronous code sequential.
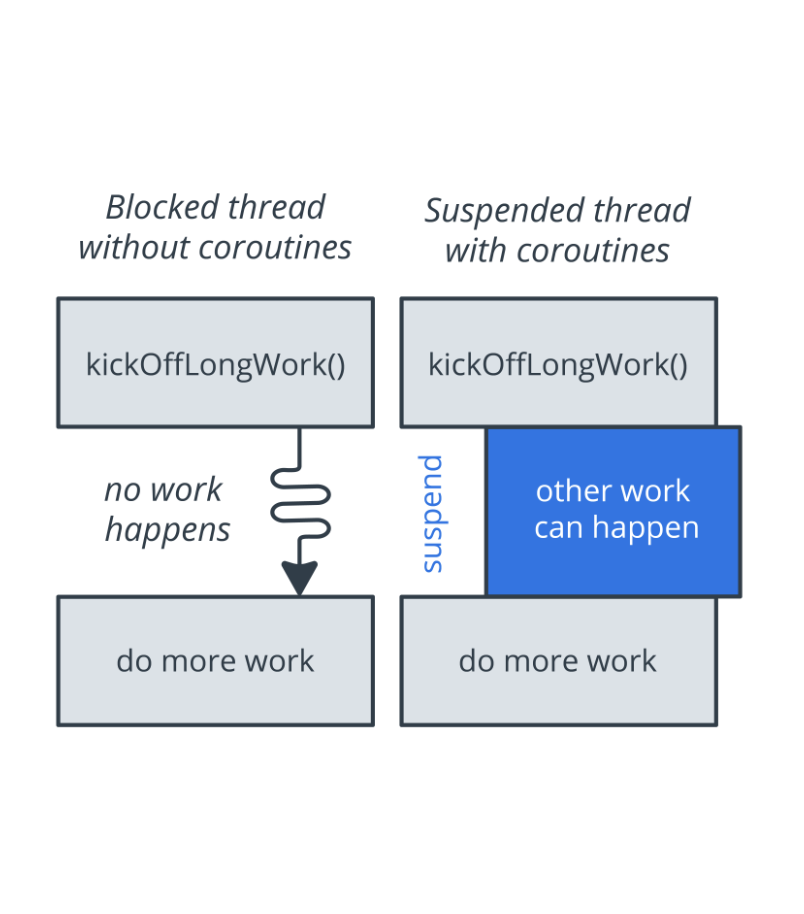
The keyword suspend is Kotlin’s way of marking a function, or function type, as being available to coroutines. When a coroutine calls a function marked with suspend, instead of blocking until the function returns like a normal function call, the coroutine suspends execution until the result is ready. Then the coroutine resumes where it left off, with the result.
While the coroutine is suspended and waiting for a result, it unblocks the thread that it’s running on. That way, other functions or coroutines can run.
The suspend keyword doesn’t specify the thread that the code runs on. A suspend function may run on a background thread, or on the main thread.
Tip: The difference between blocking and suspending is that if a thread is blocked, no other work happens. If the thread is suspended, other work happens until the result is available.
To use coroutines in Kotlin, you need three things:
Job: Basically, a job is anything that can be canceled. Every coroutine has a job, and you can use the job to cancel the coroutine. Jobs can be arranged into parent-child hierarchies. Canceling a parent job immediately cancels all the job’s children, which is a lot more convenient than canceling each coroutine manually.
Dispatcher: The dispatcher sends off coroutines to run on various threads. For example, Dispatchers.Main runs tasks on the main thread, and Dispatchers.IO offloads blocking I/O tasks to a shared pool of threads.
Scope: A coroutine’s scope defines the context in which the coroutine runs. A scope combines information about a coroutine’s job and dispatchers. Scopes keep track of coroutines. When you launch a coroutine, it’s “in a scope,” which means that you’ve indicated which scope will keep track of the coroutine.
Kotlin coroutines with Architecture components
CoroutineScope: A CoroutineScope keeps track of all your coroutines, helps you to manage when your coroutines should run. It can also cancel all of the coroutines started in it. Each asynchronous operation or a coroutine runs within a particular scope.
Architecture components provide first-class support for coroutines for logical scopes in your app. Architecture components define the following built-in scopes that you can use in your app. The built-in coroutine scopes are in the KTX extensions for each corresponding Architecture component. Be sure to add the appropriate dependencies when using these scopes.
ViewModelScope: A ViewModelScope is defined for each ViewModel in your app. Any coroutine launched in this scope is automatically canceled if the ViewModel is cleared. In this codelab you will use ViewModelScope to initiate the database operations.
Room and Dispatcher
When using the Room library to perform a database operation, Room uses a Dispatchers.IO for you to perform the database operations in the background. You don’t have to explicitly specify the Dispatchers.
Implementing Coroutines
Old method
- Open the
SleepTrackerViewModel.ktfile. DefineviewModelJoband assign it an instance of Job.
private var viewModelJob = Job()- Override onCleared() and cancel all coroutines.
override fun onCleared() {
    super.onCleared()
    viewModelJob.cancel()
}- Define a
uiScopefor the coroutines:
private val uiScope = CoroutineScope(Dispatchers.Main + viewModelJob)- continue from Step 2.3.
Step 1: Mark DAO functions as suspend functions
Open database/SleepDatabaseDao.kt, add suspend keyword to all the methods except for getAllNights(). The complete SleepDatabaseDao class will look like this.
@Dao
interface SleepDatabaseDao {

   @Insert
   suspend fun insert(night: SleepNight)

   @Update
   suspend fun update(night: SleepNight)

   @Query("SELECT * from daily_sleep_quality_table WHERE nightId = :key")
   suspend fun get(key: Long): SleepNight?

   @Query("DELETE FROM daily_sleep_quality_table")
   suspend fun clear()

   @Query("SELECT * FROM daily_sleep_quality_table ORDER BY nightId DESC LIMIT 1")
   suspend fun getTonight(): SleepNight?

   @Query("SELECT * FROM daily_sleep_quality_table ORDER BY nightId DESC")
   fun getAllNights(): LiveData<List<SleepNight>>
}
Step 2: Set up coroutines for database operations
When the Start button in the Sleep Tracker app is tapped, you want to call a function in the SleepTrackerViewModel to create a new instance of SleepNight and store the instance in the database.
Tapping any of the buttons triggers a database operation, such as creating or updating a SleepNight. For this reason and others, you use coroutines to implement click handlers for the app’s buttons.
- Open the app-level
build.gradlefile. Under the dependencies section, you need these dependencies, which were added for you.
implementation "androidx.lifecycle:lifecycle-viewmodel-ktx:2.2.0"

// Kotlin Extensions and Coroutines support for Room
implementation "androidx.room:room-ktx:$room_version"- Open the
SleepTrackerViewModelfile. Define a variable calledtonightto hold the current night. Make the variableMutableLiveData, because you need to be able to observe the data and change it.
private var tonight = MutableLiveData<SleepNight?>()- To initialize the
tonightvariable as soon as possible, create aninitblock below the definition oftonightand callinitializeTonight(). You defineinitializeTonight()in the next step.
init {
    initializeTonight()
}- Below the
initblock, implementinitializeTonight(). Use theviewModelScope.launchto start a coroutine in theViewModelScope. Inside the curly braces, get the value fortonightfrom the database by callinggetTonightFromDatabase(), and assign the value totonight.value. You definegetTonightFromDatabase()in the next step.
private fun initializeTonight() {
   viewModelScope.launch {
       tonight.value = getTonightFromDatabase()
   }
}- Implement
getTonightFromDatabase(). Define it as aprivate suspendfunction that returns a nullableSleepNight, if there is no current startedSleepNight. This leaves you with an error, because the function has to return something.
private suspend fun getTonightFromDatabase(): SleepNight? { }- Inside the function body of
getTonightFromDatabase(), gettonight(the newest night) from the database. If the start and end times are not the same, meaning that the night has already been completed, returnnull. Otherwise, return the night.
    var night = database.getTonight()
    if (night?.endTimeMilli != night?.startTimeMilli) {
        night = null
    }
    return night
Your completed getTonightFromDatabase() suspend function should look like this.
/**
*  Handling the case of the stopped app or forgotten recording,
*  the start and end times will be the same.
*
*  If the start time and end time are not the same,
*  then we do not have an unfinished recording.
*/
private suspend fun getTonightFromDatabase(): SleepNight? {
    var night = database.getTonight()
    if (night?.endTimeMilli != night?.startTimeMilli) {
        night = null
    }
    return night
}
Step 3: Add the click handler for the Start button
Now you can implement onStartTracking(), the click handler for the Start button. You need to create a new SleepNight, insert it into the database, and assign it to tonight. The structure of onStartTracking() is going to look very much like initializeTonight().
- Start with the function definition for
onStartTracking(). You can put the click handlers aboveonCleared()in theSleepTrackerViewModelfile.
fun onStartTracking() {}- Inside
onStartTracking(), launch a coroutine in theviewModelScope, because you need this result to continue and update the UI.
viewModelScope.launch {}- Inside the coroutine launch, create a new
SleepNight, which captures the current time as the start time.
val newNight = SleepNight()- Still inside the coroutine launch, call
insert()to insertnewNightinto the database. You will see an error, because you have not defined thisinsert()suspend function yet. (This is not the DAO function of the same name.)
insert(newNight)- Also inside the coroutine launch, update
tonight.
tonight.value = getTonightFromDatabase()- Below
onStartTracking(), defineinsert()as aprivate suspendfunction that takes aSleepNightas its argument.
private suspend fun insert(night: SleepNight) {}- Within the
insert()method, use the DAO to insert night into the database. Note that a coroutine with Room usesDispatchers.IO, so this will not happen on the main thread.
database.insert(night)The full function code should be:
/**
* Executes when the START button is clicked.
*/
fun onStartTracking() {
    viewModelScope.launch {
        // Create a new night, which captures the current time,
        // and insert it into the database.
        val newNight = SleepNight()

        insert(newNight)

        tonight.value = getTonightFromDatabase()
    }
}- In the
fragment_sleep_tracker.xmllayout file, add the click handler foronStartTracking()to thestart_buttonusing the magic of data binding that you set up earlier. The@{() ->function notation creates a lambda function that takes no arguments and calls the click handler in thesleepTrackerViewModel.
android:onClick="@{() -> sleepTrackerViewModel.onStartTracking()}"The pattern
Now you can see a pattern:
- Launch a coroutine that runs on the main or UI thread, because the result affects the UI. You can access the
CoroutineScopeof a ViewModel through theviewModelScopeproperty of the ViewModel, as shown in the following example: - Call a suspend function to do the long-running work, so that you don’t block the UI thread while waiting for the result.
- The long-running work has nothing to do with the UI. Switch to the I/O dispatcher,(if using Room, this code is generated for you) so that the work can run in a thread pool that’s optimized and set aside for these kinds of operations.
- Then call the long running function to do the work.
The pattern is shown below.
fun someWorkNeedsToBeDone {
   viewModelScope.launch {
        suspendFunction()
   }
}

suspend fun suspendFunction() {
   withContext(Dispatchers.IO) {
       longrunningWork()
   }
}
Using Room
// Using Room
fun someWorkNeedsToBeDone {
   viewModelScope.launch {
        suspendDAOFunction()
   }
}

suspend fun suspendDAOFunction() {
   // No need to specify the Dispatcher, Room uses Dispatchers.IO.
   longrunningDatabaseWork()
}
Step 4: Display the data
In the SleepTrackerViewModel, the nights variable references LiveData because getAllNights() in the DAO returns LiveData.
It is a Room feature that every time the data in the database changes, the LiveData nights is updated to show the latest data. You never need to explicitly set the LiveData or update it. Room updates the data to match the database.
However, if you display nights in a text view, it will show the object reference. To see the contents of the object, transform the data into a formatted string. Use a Transformation map that’s executed every time nights receives new data from the database.
- Open the
Util.ktfile and uncomment the code for the definition offormatNights()and the associatedimportstatements. To uncomment code in Android Studio, select all the code marked with//and pressCmd+/orControl+/. - Notice that
formatNights()returns a typeSpanned, which is an HTML-formatted string. - Open strings.xml. Notice the use of
CDATAto format the string resources for displaying the sleep data. - Open SleepTrackerViewModel. In the
SleepTrackerViewModelclass, define a variable callednights. Get all the nights from the database and assign them to thenightsvariable.
// Define a variable, nights. Then getAllNights() from the database
// and assign to the nights variable.
private val nights = database.getAllNights()- Right below the definition of
nights, add code to transformnightsinto anightsString. Use theformatNights()function fromUtil.kt. Passnightsinto themap()function from theTransformationsclass. To get access to your string resources, define the mapping function as callingformatNights(). Supplynightsand aResourcesobject.
/**
* Converted nights to Spanned for displaying.
*/
val nightsString = Transformations.map(nights) { nights ->
   formatNights(nights, application.resources)
}- Open the
fragment_sleep_tracker.xmllayout file. In theTextView, in theandroid:textproperty, you can now replace the resource string with a reference tonightsString.
android:text="@{sleepTrackerViewModel.nightsString}"Step 5: Add the click handler for the Stop button
Using the same pattern as in the previous step, implement the click handler for the Stop button in SleepTrackerViewModel.
- Add
onStopTracking()to theViewModel. Launch a coroutine in theviewModelScope. If the end time hasn’t been set yet, set theendTimeMillito the current system time and callupdate()with the night data. In Kotlin, thereturn@labelsyntax specifies the function from which this statement returns, among several nested functions.
fun onStopTracking() {
    viewModelScope.launch {
        // In Kotlin, the return@label syntax is used for specifying which function among
        // several nested ones this statement returns from.
        // In this case, we are specifying to return from launch(),
        // not the lambda.
        val oldNight = tonight.value ?: return@launch

        // Update the night in the database to add the end time.
        oldNight.endTimeMilli = System.currentTimeMillis()

        update(oldNight)
    }
}- Implement
update()using the same pattern as you used to implementinsert().
private suspend fun update(night: SleepNight) {
    database.update(night)
}- To connect the click handler to the UI, open the
fragment_sleep_tracker.xmllayout file and add the click handler to thestop_button.
android:onClick="@{() -> sleepTrackerViewModel.onStopTracking()}"Step 6: Add the click handler for the Clear button
- Similarly, implement
onClear()andclear().
/**
* Executes when the CLEAR button is clicked.
*/
fun onClear() {
    viewModelScope.launch {
        // Clear the database table.
        clear()

        // And clear tonight since it's no longer in the database
        tonight.value = null
    }
}

private suspend fun clear() {
    database.clear()
}- To connect the click handler to the UI, open
fragment_sleep_tracker.xmland add the click handler to theclear_button.
android:onClick="@{() -> sleepTrackerViewModel.onClear()}"Navigation and Sleep Quality
-
Now to give users a way to enter the sleep quality, we are going to use a fragment with touchable icons.
-
We press “START” to start the sleep night. Then when we press “STOP” and we navigate back to the sleep quality tracker fragment, where we can press a pretty smiley icon, which takes us right back and updates the sleep quality.
In more pragmatic terms, our basic workflow is the user presses, “STOP” is:
- On stop tracking we navigate to this
SleepQualityFragment. - We use
safeArgsto pass the correct night’s key so that we can update the correct sleep night. - Once the user taps a quality icon, we update the current night and return to the
SleepTrackerFragment. - As an additional challenge, we also need to handle the back button.
- We want the navigation to happen in the fragment, but the click handler stays in the
ViewModelprocessing the data. - We do this by creating a navigation event variable in a
ViewModel, observe the variable, when the variable changes navigate immediately, and create a navigation event variable to signify we have finished navigating.
Recording Sleep Quality
Add navigation
The navigation graph already includes the paths from the SleepTrackerFragment to the SleepQualityFragment and back again. However, the click handlers that implement the navigation from one fragment to the next are not coded yet. You add that code now in the ViewModel.
In the click handler, you set a LiveData that changes when you want the app to navigate to a different destination. The fragment observes this LiveData. When the data changes, the fragment navigates to the destination and tells the view model that it’s done, which resets the state variable.
- Open
SleepTrackerViewModel. You need to add navigation so that when the user taps the Stop button, the app navigates to theSleepQualityFragmentto collect a quality rating. - In
SleepTrackerViewModel, create aLiveDatathat changes when you want the app to navigate to theSleepQualityFragment. Use encapsulation to only expose a gettable version of theLiveDatato theViewModel. You can put this code anywhere at the top level of the class body.
/**
* Variable that tells the Fragment to navigate to a specific [SleepQualityFragment]
*
* This is private because we don't want to expose setting this value to the Fragment.
*/

private val _navigateToSleepQuality = MutableLiveData<SleepNight>()
val navigateToSleepQuality: LiveData<SleepNight>
get() = _navigateToSleepQuality- Add a
doneNavigating()function that resets the variable that triggers navigation.
/**
* Call this immediately after navigating to [SleepQualityFragment]
*
* It will clear the navigation request, so if the user rotates their phone it won't navigate
* twice.
*/
fun doneNavigating() {
    _navigateToSleepQuality.value = null
}- In the click handler for the Stop button,
onStopTracking(), trigger the navigation to theSleepQualityFragment. Set thenavigateToSleepQualityvariable at the end of the function as the last thing inside thelaunch{}block. Note that this variable is set to thenight. When this variable has a value, the app navigates to theSleepQualityFragment, passing along the night.
_navigateToSleepQuality.value = oldNight- The
SleepTrackerFragmentneeds to observenavigateToSleepQualityso that the app knows when to navigate. In theSleepTrackerFragment, inonCreateView(), add an observer fornavigateToSleepQuality(). Note that the import for this is ambiguous and you need to importandroidx.lifecycle.Observer. - Inside the observer block, navigate and pass along the ID of the current night, and then call
doneNavigating(). If your import is ambiguous, importandroidx.navigation.fragment.findNavController.
// Add an Observer on the state variable for Navigating when STOP button is pressed.
sleepTrackerViewModel.navigateToSleepQuality.observe(viewLifecycleOwner, Observer { night ->
    night?.let {
        // We need to get the navController from this, because button is not ready, and it
        // just has to be a view. For some reason, this only matters if we hit stop again
        // after using the back button, not if we hit stop and choose a quality.
        // Also, in the Navigation Editor, for Quality -> Tracker, check "Inclusive" for
        // popping the stack to get the correct behavior if we press stop multiple times
        // followed by back.
        // Also: https://stackoverflow.com/questions/28929637/difference-and-uses-of-oncreate-oncreateview-and-onactivitycreated-in-fra
        this.findNavController().navigate(
                SleepTrackerFragmentDirections
                        .actionSleepTrackerFragmentToSleepQualityFragment(night.nightId))
        // Reset state to make sure we only navigate once, even if the device
        // has a configuration change.
        sleepTrackerViewModel.doneNavigating()
    }
})
Kotlin let
-
lettakes the object it is invoked upon as the parameter and returns the result of the lambda expression. -
Kotlin let is a scoping function wherein the variables declared inside the expression cannot be used outside.
-
Additionally, let is useful for checking Nullable properties as shown below.
var name : String? = "Kotlin let null check"
name?.let { println(it) } //prints Kotlin let null check
name = null
name?.let { println(it) } //nothing happens
Record the sleep quality
Step 1: Create a ViewModel and a ViewModelFactory
- In the
sleepqualitypackage, create or open SleepQualityViewModel.kt. - Create a
SleepQualityViewModelclass that takes asleepNightKeyand database as arguments. Just as you did for theSleepTrackerViewModel, you need to pass in thedatabasefrom the factory. You also need to pass in thesleepNightKeyfrom the navigation.
/**
* ViewModel for SleepQualityFragment.
*
* @param sleepNightKey The key of the current night we are working on.
*/
class SleepQualityViewModel(
    private val sleepNightKey: Long = 0L,
    val database: SleepDatabaseDao) : ViewModel() {
}- To navigate back to the
SleepTrackerFragmentusing the same pattern as above, declare_navigateToSleepTracker. ImplementnavigateToSleepTrackeranddoneNavigating().
/**
* Variable that tells the fragment whether it should navigate to [SleepTrackerFragment].
*
* This is `private` because we don't want to expose the ability to set [MutableLiveData] to
* the [Fragment]
*/
private val _navigateToSleepTracker = MutableLiveData<Boolean?>()

/**
* When true immediately navigate back to the [SleepTrackerFragment]
*/
val navigateToSleepTracker: LiveData<Boolean?>
    get() = _navigateToSleepTracker


/**
* Call this immediately after navigating to [SleepTrackerFragment]
*/
fun doneNavigating() {
    _navigateToSleepTracker.value = null
}- Create one click handler,
onSetSleepQuality(), for all the sleep-quality images to use. Use the same coroutine pattern:
-
Launch a coroutine in the
viewModelScope -
Get
tonightusing thesleepNightKey. -
Set the sleep quality.
-
Update the database.
-
Trigger navigation.
Notice that the code sample below does all the work in the click handler, instead of factoring out the database operation in the different context.
/**
* Sets the sleep quality and updates the database.
*
* Then navigates back to the SleepTrackerFragment.
*/
fun onSetSleepQuality(quality: Int) {
    viewModelScope.launch {
            val tonight = database.get(sleepNightKey) ?: return@launch
            tonight.sleepQuality = quality
            database.update(tonight)

        // Setting this state variable to true will alert the observer and trigger navigation.
        _navigateToSleepTracker.value = true
    }
}- In the
sleepqualitypackage, create or openSleepQualityViewModelFactory.ktand add theSleepQualityViewModelFactoryclass, as shown below. This class uses a version of the same boilerplate code you’ve seen before. Inspect the code before you move on.
/**
 * This is pretty much boiler plate code for a ViewModel Factory.
 *
 * Provides the key for the night and the SleepDatabaseDao to the ViewModel.
 */
class SleepQualityViewModelFactory(
        private val sleepNightKey: Long,
        private val dataSource: SleepDatabaseDao) : ViewModelProvider.Factory {
    @Suppress("unchecked_cast")
    override fun <T : ViewModel?> create(modelClass: Class<T>): T {
        if (modelClass.isAssignableFrom(SleepQualityViewModel::class.java)) {
            return SleepQualityViewModel(sleepNightKey, dataSource) as T
        }
        throw IllegalArgumentException("Unknown ViewModel class")
    }
}
Step 2: Update the SleepQualityFragment
- Open
SleepQualityFragment.kt. - In
onCreateView(), after you get theapplication, you need to get theargumentsthat came with the navigation. These arguments are inSleepQualityFragmentArgs. You need to extract them from the bundle.
val arguments = SleepQualityFragmentArgs.fromBundle(arguments!!)- Next, get the
dataSource.
val dataSource = SleepDatabase.getInstance(application).sleepDatabaseDao- Create a factory, passing in the
dataSourceand thesleepNightKey.
val viewModelFactory = SleepQualityViewModelFactory(arguments.sleepNightKey, dataSource)- Get a
ViewModelreference.
// Get a reference to the ViewModel associated with this fragment.
val sleepQualityViewModel =
        ViewModelProvider(
this, viewModelFactory).get(SleepQualityViewModel::class.java)- Add the
ViewModelto the binding object. (If you see an error with the binding object, ignore it for now.)
binding.sleepQualityViewModel = sleepQualityViewModel- Add the observer. When prompted, import
androidx.lifecycle.Observer.
// Add an Observer to the state variable for Navigating when a Quality icon is tapped.
sleepQualityViewModel.navigateToSleepTracker.observe(viewLifecycleOwner, Observer {
    if (it == true) { // Observed state is true.
        this.findNavController().navigate(
                SleepQualityFragmentDirections.actionSleepQualityFragmentToSleepTrackerFragment())
        // Reset state to make sure we only navigate once, even if the device
        // has a configuration change.
        sleepQualityViewModel.doneNavigating()
    }
})
Step 3: Update the layout file and run the app.
- Open the
fragment_sleep_quality.xmllayout file. In the<data>block, add a variable for theSleepQualityViewModel.
<data>
    <variable
        name="sleepQualityViewModel"
        type="com.example.android.trackmysleepquality.sleepquality.SleepQualityViewModel" />
</data>- For each of the six sleep-quality images, add a click handler like the one below. Match the quality rating to the image.
android:onClick="@{() -> sleepQualityViewModel.onSetSleepQuality(5)}"Button States
Now your app works great. The user can tap Start and Stop as many times as they want. When the user taps Stop, they can enter a sleep quality. When the user taps Clear, all the data is cleared silently in the background. However, all the buttons are always enabled and clickable, which does not break the app, but it does allow users to create incomplete sleep nights.
The idea is to set the button state so that in the beginning, only the Start button is enabled, which means it is clickable.
After the user taps Start, the Stop button becomes enabled and Start is not. The Clear button is only enabled when there is data in the database.
- Open the
fragment_sleep_tracker.xmllayout file. - Add the
android:enabledproperty to each button. Theandroid:enabledproperty is a boolean value that indicates whether or not the button is enabled. (An enabled button can be tapped; a disabled button can’t.) Give the property the value of a state variable that you’ll define in a moment.
start_button:
android:enabled="@{sleepTrackerViewModel.startButtonVisible}"stop_button:
android:enabled="@{sleepTrackerViewModel.stopButtonVisible}"clear_button:
android:enabled="@{sleepTrackerViewModel.clearButtonVisible}"- Open
SleepTrackerViewModeland create three corresponding variables. Assign each variable a transformation that tests it.
- The Start button should be enabled when
tonightisnull. - The Stop button should be enabled when
tonightis notnull. - The Clear button should only be enabled if
nights, and thus the database, contains sleep nights.
/**
* If tonight has not been set, then the START button should be visible.
*/
val startButtonVisible = Transformations.map(tonight) {
    null == it
}

/**
* If tonight has been set, then the STOP button should be visible.
*/
val stopButtonVisible = Transformations.map(tonight) {
    null != it
}

/**
* If there are any nights in the database, show the CLEAR button.
*/
val clearButtonVisible = Transformations.map(nights) {
    it?.isNotEmpty()
}
Tip: Setting the appearance of a disabled View
The enabled attribute is not the same as the visibility attribute. The enabled attribute only determines whether the View is enabled, not whether the View is visible.
The meaning of “enabled” varies by the subclass. A user can edit the text in an enabled EditText, but not in a disabled EditText. A user can tap an enabled Button, but can’t tap a disabled one.
A default style is applied to a disabled View to visually represent that the View is not active.
However, if the View has a background attribute or a textColor attribute, the values of those attributes are used when the View is displayed, even if the View is disabled.
To define which colors to use for enabled and disabled states, use a ColorStateList for the text color and a StateListDrawable for the background color.
SnackBar
After the user clears the database, show the user a confirmation using the Snackbar widget. A snackbar provides brief feedback about an operation through a message at the bottom of the screen. A snackbar disappears after a timeout, after a user interaction elsewhere on the screen, or after the user swipes the snackbar off the screen.
Showing the snackbar is a UI task, and it should happen in the fragment. Deciding to show the snackbar happens in the ViewModel. To set up and trigger a snackbar when the data is cleared, you can use the same technique as for triggering navigation.
- In the
SleepTrackerViewModel, create the encapsulated event.
/**
* Request a toast by setting this value to true.
*
* This is private because we don't want to expose setting this value to the Fragment.
*/
private var _showSnackbarEvent = MutableLiveData<Boolean>()

/**
* If this is true, immediately `show()` a toast and call `doneShowingSnackbar()`.
*/
val showSnackBarEvent: LiveData<Boolean>
get() = _showSnackbarEvent- Then implement
doneShowingSnackbar().
/**
* Call this immediately after calling `show()` on a toast.
*
* It will clear the toast request, so if the user rotates their phone it won't show a duplicate
* toast.
*/

fun doneShowingSnackbar() {
    _showSnackbarEvent.value = false
}- In the
SleepTrackerFragment, inonCreateView(), add an observer:
sleepTrackerViewModel.showSnackBarEvent.observe(viewLifecycleOwner, Observer {})- Inside the observer block, display the snackbar and immediately reset the event.
if (it == true) { // Observed state is true.
    Snackbar.make(
            requireActivity().findViewById(android.R.id.content),
            getString(R.string.cleared_message),
            Snackbar.LENGTH_SHORT // How long to display the message.
    ).show()
    // Reset state to make sure the snackbar is only shown once, even if the device
    // has a configuration change.
    sleepTrackerViewModel.doneShowingSnackbar()
}- In
SleepTrackerViewModel, trigger the event in theonClear()method. To do this, set the event value totrueinside thelaunchblock:
// Show a snackbar message, because it's friendly.
_showSnackbarEvent.value = true
Summary
Create a Room Database
- Define your tables as data classes annotated with
@Entity. Define properties annotated with@ColumnInfoas columns in the tables. - Define a data access object (DAO) as an interface annotated with
@Dao. The DAO maps Kotlin functions to database queries. - Use annotations to define
@Insert,@Delete, and@Updatefunctions. - Use the
@Queryannotation with an SQLite query string as a parameter for any other queries. - Create an abstract class that has a
getInstance()function that returns a database. - Use instrumented tests to test that your database and DAO are working as expected. You can use the provided tests as a template.
Coroutines and Room
- Use
ViewModel,ViewModelFactory, and data binding to set up the UI architecture for the app. - To keep the UI running smoothly, use coroutines for long-running tasks, such as all database operations.
- Coroutines are asynchronous and non-blocking. They use
suspendfunctions to make asynchronous code sequential. - When a coroutine calls a function marked with
suspend, instead of blocking until that function returns like a normal function call, it suspends execution until the result is ready. Then it resumes where it left off with the result. - The difference between blocking and suspending is that if a thread is blocked, no other work happens. If the thread is suspended, other work happens until the result is available.
To implement click handlers that trigger database operations, follow this pattern:
- Launch a coroutine that runs on the main or UI thread, because the result affects the UI.
- Call a suspend function to do the long-running work, so that you don’t block the UI thread while waiting for the result.
- The long-running work has nothing to do with the UI, so switch to the I/O context. That way, the work can run in a thread pool that’s optimized and set aside for these kinds of operations.
- Then call the long running function to do the work.
Use a Transformations map to create a string from a LiveData object every time the object changes.
Use LiveData to control button states
Implementing sleep quality tracking in this app is like playing a familiar piece of music in a new key. While details change, the underlying pattern of what you did in previous codelabs in this lesson remains the same. Being aware of these patterns makes coding much faster, because you can reuse code from existing apps. Here are some of the patterns used in this course so far:
- Create a
ViewModeland aViewModelFactoryand set up a data source. - Trigger navigation. To separate concerns, put the click handler in the view model and the navigation in the fragment.
- Use encapsulation with
LiveDatato track and respond to state changes. - Use transformations with
LiveData. - Create a singleton database.
- Set up coroutines for database operations.
Triggering navigation
You define possible navigation paths between fragments in a navigation file. There are some different ways to trigger navigation from one fragment to the next. These include:
- Define
onClickhandlers to trigger navigation to a destination fragment. - Alternatively, to enable navigation from one fragment to the next:
- Define a
LiveDatavalue to record if navigation should occur. - Attach an observer to that
LiveDatavalue. - Your code then changes that value whenever navigation needs to be triggered or is complete.
Setting the android:enabled attribute
- The
android:enabledattribute is defined inTextViewand inherited by all subclasses, includingButton. - The
android:enabledattribute determines whether or not aViewis enabled. The meaning of “enabled” varies by subclass. For example, a non-enabledEditTextprevents the user from editing the contained text, and a non-enabledButtonprevents the user from tapping the button. - The
enabledattribute is not the same as thevisibilityattribute. - You can use transformation maps to set the value of the
enabledattribute of buttons based on the state of another object or variable.
Other points covered in this codelab:
- To trigger notifications to the user, you can use the same technique as you use to trigger navigation.
- You can use a
Snackbarto notify the user.