Lesson 07: RecyclerView
Everything is better in a list! Recycler View has been - and continues to be - an essential component of any app design. This lesson is all about making your app better with Recycler Views.
RecyclerView
Displaying a list or grid of data is one of the most common UI tasks in Android. Lists vary from simple to very complex. A list of text views might show simple data, such as a shopping list. A complex list, such as an annotated list of vacation destinations, might show the user many details inside a scrolling grid with headers.
To support all these use cases, Android provides the RecyclerView widget.
-
RecyclerViewis designed to be efficient even when displaying extremely large lists. It allows you to build everything from simple lists ofTextViewsall the way to very complex collections of views. -
It only support displaying different types of items in the same list. For example, a news app may want to mix video items into a list of headlines.
-
RecyclerViewis also highly customizable. Out-of-the-box, it supports lists and grids. You can configure it to scroll horizontally or vertically. If the default options aren’t enough, you can even build your own layout manager to makeRecyclerViewdisplay any design you dream up.
Advantages of RecyclerView
-
Efficient display of large list.
-
Minimizing refreshes when an item is updated, deleted, or added to the list.
-
Reusing views that scroll off screen to display the next item that scrolls on screen.
-
Displaying items in a list or a grid.
-
Scrolling vertically or horizontally.
-
Allowing custom layouts when a list or a grid is not enough for the use case.
The greatest benefit of RecyclerView is that it is very efficient for large lists:
-
By default,
RecyclerViewonly does work to process or draw items that are currently visible on the screen. For example, if your list has a thousand elements but only 10 elements are visible,RecyclerViewdoes only enough work to draw 10 items on the screen. When the user scrolls,RecyclerViewfigures out what new items should be on the screen and does just enough work to display those items. -
When an item scrolls off the screen, the item’s views are recycled. That means the item is filled with new content that scrolls onto the screen. This
RecyclerViewbehavior saves a lot of processing time and helps lists scroll fluidly. -
When an item changes, instead of redrawing the entire list,
RecyclerViewcan update that one item. This is a huge efficiency gain when displaying lists of complex items!
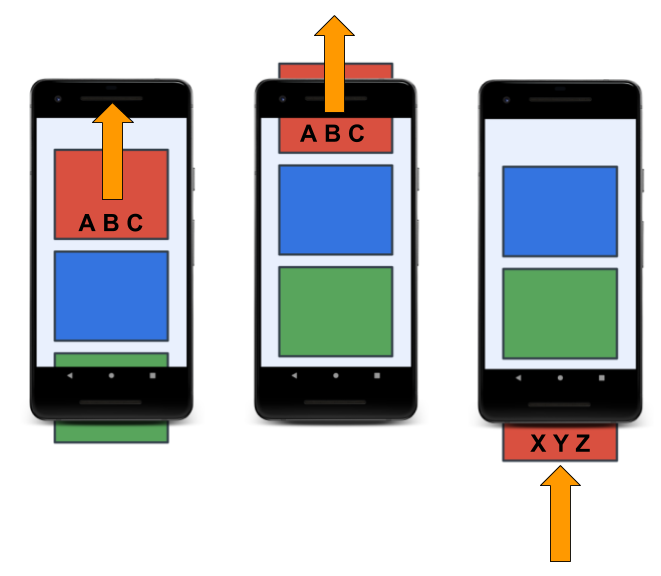
In the sequence shown below, you can see that one view has been filled with data, ABC. After that view scrolls off the screen, RecyclerView reuses the view for new data, XYZ.
Other options
RecyclerView, while efficient and customizable, is not the only way to display a list of things on Androids.
Android also ships with a few other options for displaying lists.
-
The first are
ListViewandGridViewfor displaying a scrolling list and grid respectively. You can think of this asRecyclerViewsimpler, but less powerful siblings. Both of them work for displaying a small list of items that aren’t too complex, like 100 items. They are not nearly as efficient asRecyclerView, and they don’t offer nearly as many options for customizing the display. -
The other option is
LinearLayout. You’ve already seen that earlier linear layout can be used to display a small list of items, for example three to five.
Your first RecyclerView
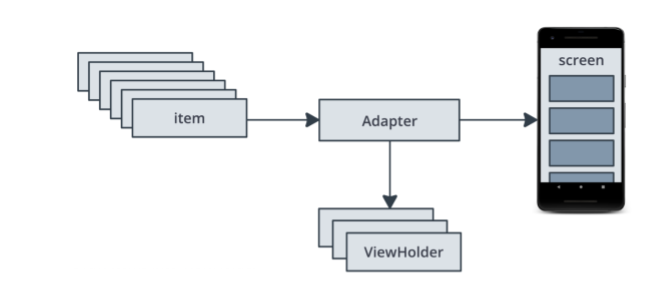
The adapter pattern
If you ever travel between countries that use different electric sockets, you probably know how you can plug your devices into outlets by using an adapter. The adapter lets you convert one type of plug to another, which is really converting one interface into another.
The adapter pattern in software engineering helps an object to work with another API. RecyclerView uses an adapter to transform app data into something the RecyclerView can display, without changing how the app stores and processes the data. For the sleep-tracker app, you build an adapter that adapts data from the Room database into something that RecyclerView knows how to display, without changing the ViewModel.
Adapter Interface
RecyclerView adapters must provide a few methods for RecyclerView to understand how to display the data on screen.
-
First, in order to know how far to scroll, the adapter needs to tell the recycler view how many items are available.
-
Then you provide a way for the RecyclerView to draw a specific item.
RecyclerViewwe’ll use this anytime an item enters the screen or if you update or add an item that’s churned on the screen. -
Finally, you must provide
RecyclerViewwith a way to create a new view for an item. This is important because while recycler view is responsible for handling the recycling and efficient display of the views, it has no idea what kind of views you would like to display.
How does RecyclerView works?
-
When
RecyclerViewruns, it will use the adapter to figure out how to display your data on screen. -
When it first starts out, it will ask the adapter how many items there are. If the adapter set there is 100, it will immediately start creating just the views needed for the first screen.
-
First, recycler view will ask the adapter to create a new view for the first data item in your list.
-
Once it has the view, it will ask the adapter to draw the item. It will repeat this until it doesn’t need any more views to fill the screen.
-
Then your
RecyclerViewis done. It won’t look at the other items in the list until the user scrolls to list on screen. -
If it’s items go off the screen, they will be reused or recycled in the next position that gets displayed.
-
When recycling,
RecyclerViewdoesn’t need to create a view. It will just use the old one and ask the adapter how to draw the next item into it.
ViewHolder
To implement recycling and support multiple types of views, RecyclerView doesn’t interact it to views but instead ViewHolders. This is the last part of the adapter interface.
-
ViewHoldersdo exactly what it sounds like they do, hold views. They also had a lot of extra information thatRecyclerViewuses to efficiently move views around the screen. -
ViewsHoldersknow things like the last position the items have in the list, which is important when you are animating list changes. In other words, storing information for RecyclerView. -
ViewHoldersreally don’t do that much, and they’re mostly an implementation detail of theRecyclerView. Your adapter will take care of providing anyViewHoldersthat theRecyclerViewneeds.
Implementing a RecyclerView
To display your data in a RecyclerView, you need the following parts:
-
Data to display.
-
A
RecyclerViewinstance defined in your layout file, to act as the container for the views. -
A layout for one item of data.
If all the list items look the same, you can use the same layout for all of them, but that is not mandatory. The item layout has to be created separately from the fragment’s layout, so that one item view at a time can be created and filled with data. -
A layout manager.
ARecyclerViewuses aLayoutManagerto organize the layout of the items in theRecyclerView, such as laying them out in a grid or in a linear list. In the<RecyclerView>in the layout file, set theapp:layoutManagerattribute to the layout manager (such asLinearLayoutManagerorGridLayoutManager). You can also set theLayoutManagerfor aRecyclerViewprogrammatically. -
A view holder.
The view holder extends theViewHolderclass. It contains the view information for displaying one item from the item’s layout. View holders also add information thatRecyclerViewuses to efficiently move views around the screen. -
The
onBindViewHolder()method in the adapter adapts the data to the views. You always override this method. Typically,onBindViewHolder()inflates the layout for an item, and puts the data in the views in the layout. -
Because the
RecyclerViewknows nothing about the data, theAdapterneeds to inform theRecyclerViewwhen that data changes. UsenotifyDataSetChanged()to notify theAdapterthat the data has changed. -
An adapter.
The adapter connects your data to theRecyclerView. It adapts the data so that it can be displayed in aViewHolder. ARecyclerViewuses the adapter to figure out how to display the data on the screen.
The adapter requires you to implement the following methods:
–getItemCount()to return the number of items.
–onCreateViewHolder()to return theViewHolderfor an item in the list.
–onBindViewHolder()to adapt the data to the views for an item in the list.
Adding a RecyclerView
Step 1: Add RecyclerView with LayoutManager
- Open the module
build.gradlefile, scroll to the end, add a new dependency.
implementation 'androidx.recyclerview:recyclerview:1.1.0'- Open the
fragment_sleep_tracker.xmllayout file in the Code tab in Android Studio and replace the entireScrollView, including the enclosedTextView, with aRecyclerView. - Add a layout manager to the
RecyclerViewXML. EveryRecyclerViewneeds a layout manager that tells it how to position items in the list. Android provides aLinearLayoutManager, which by default lays out the items in a vertical list of full width rows.
 <androidx.recyclerview.widget.RecyclerView
  android:id="@+id/sleep_list"
  android:layout_width="0dp"
  android:layout_height="0dp"
  app:layout_constraintBottom_toTopOf="@+id/clear_button"
  app:layout_constraintEnd_toEndOf="parent"
  app:layout_constraintStart_toStartOf="parent"
  app:layout_constraintTop_toBottomOf="@+id/stop_button"
  app:layoutManager="androidx.recyclerview.widget.LinearLayoutManager"/>
Step 2: Create the list item layout and text view holder
The RecyclerView is only a container. In this step, you create the layout and infrastructure for the items to be displayed inside the RecyclerView.
To get to a working RecyclerView as quickly as possible, at first you use a simplistic list item that only displays the sleep quality as a number. For this, you need a view holder, TextItemViewHolder. You also need a view, a TextView, for the data. (In a later step, you learn more about view holders and how to lay out all the sleep data.)
- Create a layout file called
text_item_view.xml. It doesn’t matter what you use as the root element, because you’ll replace the template code. - In
text_item_view.xml, delete all the given code. - Add a
TextViewwith16dppadding at the start and end, and a text size of24sp. Let the width match the parent, and the height wrap the content. Because this view is displayed inside theRecyclerView, you don’t have to place the view inside aViewGroup.
<?xml version="1.0" encoding="utf-8"?>
<TextView xmlns:android="http://schemas.android.com/apk/res/android"
 android:textSize="24sp"
 android:paddingStart="16dp"
 android:paddingEnd="16dp"
 android:layout_width="match_parent"
android:layout_height="wrap_content" />- Open
Util.kt. Scroll to the end and add the definition that’s shown below, which creates theTextItemViewHolderclass. Put the code at the bottom of the file, after the last closing brace. The code goes inUtil.ktbecause this view holder is temporary, and you replace it later.
class TextItemViewHolder(val textView: TextView): RecyclerView.ViewHolder(textView)- If you are prompted, import
android.widget.TextViewandandroidx.recyclerview.widget.RecyclerView.
Step 3: Create SleepNightAdapter
The core task in implementing a RecyclerView is creating the adapter. You have a simple view holder for the item view, and a layout for each item. You can now create an adapter. The adapter creates a view holder and fills it with data for the RecyclerView to display.
- In the
sleeptrackerpackage, create a new Kotlin class calledSleepNightAdapter. - Make the
SleepNightAdapterclass extendRecyclerView.Adapter. The class is calledSleepNightAdapterbecause it adapts aSleepNightobject into something thatRecyclerViewcan use. The adapter needs to know what view holder to use, so pass inTextItemViewHolder. Import necessary components when prompted, and then you’ll see an error, because there are mandatory methods to implement.
class SleepNightAdapter: RecyclerView.Adapter<TextItemViewHolder>() {}- At the top level of
SleepNightAdapter, create alistOfSleepNighta data source variable to hold the data.
var data = listOf<SleepNight>()- In
SleepNightAdapter, overridegetItemCount()to return the size of the list of sleep nights indata. TheRecyclerViewneeds to know how many items the adapter has for it to display, and it does that by callinggetItemCount().
override fun getItemCount() = data.size- In
SleepNightAdapter, override theonBindViewHolder()function, as shown below. TheonBindViewHolder()function is called byRecyclerViewto display the data for one list item at the specified position. So theonBindViewHolder()method takes two arguments: a view holder, and a position of the data to bind. For this app, the holder is theTextItemViewHolder, and the position is the position in the list.
override fun onBindViewHolder(holder: TextItemViewHolder, position: Int) {}- Inside
onBindViewHolder(), create a variable for one item at a given position in the data.
val item = data[position]- The
ViewHolderyou created has a property calledtextView. InsideonBindViewHolder(), set thetextof thetextViewto the sleep-quality number. This code displays only a list of numbers, but this simple example lets you see how the adapter gets the data into the view holder and onto the screen.
holder.textView.text = item.sleepQuality.toString()- In
SleepNightAdapter, override and implementonCreateViewHolder(), which is called when theRecyclerViewneeds a view holder to represent an item. This function takes two parameters and returns aViewHolder. Theparentparameter, which is the view group that holds the view holder, is always theRecyclerView. TheviewTypeparameter is used when there are multiple views in the sameRecyclerView. For example, if you put a list of text views, an image, and a video all in the sameRecyclerView, theonCreateViewHolder()function would need to know what type of view to use.
override fun onCreateViewHolder(parent: ViewGroup, viewType: Int): TextItemViewHolder {}- In
onCreateViewHolder(), create an instance ofLayoutInflater. The layout inflater knows how to create views from XML layouts. Thecontextcontains information on how to correctly inflate the view. In an adapter for a recycler view, you always pass in the context of theparentview group, which is theRecyclerView.
val layoutInflater = LayoutInflater.from(parent.context)- In
onCreateViewHolder(), create theviewby asking thelayoutinflaterto inflate it. Pass in the XML layout for the view, and theparentview group for the view. The third, boolean, argument isattachToRoot. This argument needs to befalse, becauseRecyclerViewadds this item to the view hierarchy for you when it’s time.
val view = layoutInflater.inflate(R.layout.text_item_view, parent, false) as TextView- In
onCreateViewHolder(), return aTextItemViewHoldermade withview.
return TextItemViewHolder(view)- The adapter needs to let the
RecyclerViewknow when thedatahas changed, because theRecyclerViewknows nothing about the data. It only knows about the view holders that the adapter gives to it. To tell theRecyclerViewwhen the data that it’s displaying has changed, add a custom setter to thedatavariable that’s at the top of theSleepNightAdapterclass. In the setter, givedataa new value, then callnotifyDataSetChanged()to trigger redrawing the list with the new data.
var data = listOf<SleepNight>()
  set(value) {
  field = value
  notifyDataSetChanged()
  }
Note: When notifyDataSetChanged() is called, the RecyclerView redraws the whole list, not just the changed items. This is simple, and it works for now. You improve on this code later.
SleepNightAdapter full code should be like:
class SleepNightAdapter : RecyclerView.Adapter<TextItemViewHolder>() {

 var data = listOf<SleepNight>()
 set(value) {
 field = value
 notifyDataSetChanged()
 }

 override fun getItemCount() = data.size

 override fun onBindViewHolder(holder: TextItemViewHolder, position: Int) {
 val item = data[position]
 holder.textView.text = item.sleepQuality.toString()
 }

 override fun onCreateViewHolder(parent: ViewGroup, viewType: Int): TextItemViewHolder {

 val layoutInflater = LayoutInflater.from(parent.context)
 val view = layoutInflater
 .inflate(R.layout.text_item_view, parent, false) as TextView

 return TextItemViewHolder(view)
 }
}
Step 4: Tell RecyclerView about the Adapter
The RecyclerView needs to know about the adapter to use to get view holders.
- Open
SleepTrackerFragment.kt. InonCreateview(), create an adapter. Put this code after the creation of theViewModelmodel, and before thereturnstatement.
val adapter = SleepNightAdapter()- Associate the
adapterwith theRecyclerViewusing binding.
binding.sleepList.adapter = adapter- Clean and rebuild your project to update the
bindingobject. If you still see errors aroundbinding.sleepListorbinding.FragmentSleepTrackerBinding, invalidate caches and restart. (Select File > Invalidate Caches / Restart.)
Step 5: Get data into the adapter
So far you have an adapter, and a way to get data from the adapter into the RecyclerView. Now you need to get data into the adapter from the ViewModel.
- Open
SleepTrackerViewModel. Find thenightsvariable, which stores all the sleep nights, which is the data to display. Thenightsvariable is set by callinggetAllNights()on the database. Removeprivatefromnights, because you will create an observer that needs to access this variable. Your declaration should look like this:
val nights = database.getAllNights()-
In the
databasepackage, open theSleepDatabaseDao. Find thegetAllNights()function. Notice that this function returns a list ofSleepNightvalues asLiveData. This means that thenightsvariable containsLiveDatathat is kept updated byRoom, and you can observenightsto know when it changes. -
Open
SleepTrackerFragment. InonCreateView(), below the creation of theadapter, create an observer on thenightsvariable. By supplying the fragment’sviewLifecycleOwneras the lifecycle owner, you can make sure this observer is only active when theRecyclerViewis on the screen.
sleepTrackerViewModel.nights.observe(viewLifecycleOwner, Observer { })- Inside the observer, whenever you get a non-null value (for
nights), assign the value to the adapter’sdata. This is the completed code for the observer and setting the data:
sleepTrackerViewModel.nights.observe(viewLifecycleOwner, Observer {
 it?.let {
 adapter.data = it
 }
})
Debugging tips
If your app compiles but doesn’t work, here are a few things to check:
-
Make sure you’ve added at least one night of sleep.
-
Do you call
notifyDataSetChanged()inSleepNightAdapter? -
Try setting a breakpoint to make sure it’s getting called.
-
Did you register an observer on
sleepTrackerViewModel.nightsinSleepTrackerFragment? -
Did you set the adapter in
SleepTrackerFragmentwithbinding.sleepList.adapter = adapter? -
Does
datainSleepNightAdapterhold a non-empty list? -
Try setting a breakpoint in the setter and
getItemCount().
Recycling ViewHolders
RecyclerView recycles view holders, which means that it reuses them. As a view scrolls off the screen, RecyclerView reuses the view for the view that’s about to scroll onto the screen.
Because these view holders are recycled, make sure onBindViewHolder() sets or resets any customizations that previous items might have set on a view holder.
For example, you could set the text color to red in view holders that hold quality ratings that are less than or equal to 1 and represent poor sleep.
- In the
SleepNightAdapterclass, add the following code to at the end ofonBindViewHolder().
if (item.sleepQuality <= 1) {
  holder.textView.setTextColor(Color.RED) // red
}-
Run the app. Add some low sleep-quality data, and the number is red. Add high ratings for sleep quality until you see a red high number on the screen. As
RecyclerViewreuses view holders, it eventually reuses one of the red view holders for a high quality rating. The high rating is erroneously displayed in red. -
To fix this, add an
elsestatement to set the color to black if the quality is not less than or equal to one. With both conditions explicit, the view holder will use the correct text color for each item.
if (item.sleepQuality <= 1) {
  holder.textView.setTextColor(Color.RED) // red
} else {
  // reset
  holder.textView.setTextColor(Color.BLACK) // black
}
ViewHolders
Before we dive into making our own ViewHolder, let’s take a look at the starter ViewHolder that was provided for this lesson.
- If you open
Utill.kt, you will find the definition ofTextItemViewHolder. Taking a look at this declaration, it doesn’t look like it’s doing very much. It’s basic directing aTextViewin aTextItemViewHolderby declaring it as a wall, it’s available as a property.
class TextItemViewHolder(val textView: TextView): RecyclerView.ViewHolder(textView)- So why does
RecyclerViewnot just use aTextViewdirectly? This one line of code provides a lot of functionality. AViewHolderdescribes an item view and metadata about its place within theRecyclerView.RecyclerViewrelies on this functionality to correctly position the view as the list scrolls, and to do interesting things like animate views when items are added or removed in theAdapter.
A ViewHolder describes an item view and metadata about its place within the RecyclerView. In other words, a ViewHolder tells a RecyclerView where and how an item should get drawn in the list.
itemView is the reference that RecyclerView reviews when it needs to access the actual view that’s being displayed.
-
RecyclerViewwill useitemViewwhen binding an item to display on the screen, when drawing decorations around the view like a border, and for accessibility. -
RecyclerViewdoesn’t care what kind of view is startingitemView. You can put anything you want here, like aTextViewor even a constraint layout.
getAdapterPosition() can be used by the RecyclerView to figure out the position in the list that was bound to a particular ViewHolder.
getLayoutPosition() can used to know in what position the ViewHolder was displayed.
Most of these methods are final. RecyclerView will provide them for us and we won’t ever need to coat them. However, there is one method that you might provide. Your ViewHolder can tell RecyclerView what its ID is. An ID is just a unique identifier like night ID on our sleep night. When you override getItemId(), RecyclerView can use this ID when performing animations.
Display the SleepQuality List
In this step, you create the layout file for one item. The layout consists of a ConstraintLayout with an ImageView for the sleep quality, a TextView for the sleep length, and a TextView for the quality as text. Because you’ve done layouts before, copy and paste the provided XML code.
Step 1: Create the item layout
- Create a new layout resource file and name it
list_item_sleep_night. - Replace all the code in the file with the code below. Then familiarize yourself with the layout you just created.
<?xml version="1.0" encoding="utf-8"?>
<androidx.constraintlayout.widget.ConstraintLayout xmlns:android="http://schemas.android.com/apk/res/android"
  xmlns:app="http://schemas.android.com/apk/res-auto"
  xmlns:tools="http://schemas.android.com/tools"
  android:layout_width="match_parent"
  android:layout_height="wrap_content">

  <ImageView
  android:id="@+id/quality_image"
  android:layout_width="@dimen/icon_size"
  android:layout_height="60dp"
  android:layout_marginStart="16dp"
  android:layout_marginTop="8dp"
  android:layout_marginBottom="8dp"
  app:layout_constraintBottom_toBottomOf="parent"
  app:layout_constraintStart_toStartOf="parent"
  app:layout_constraintTop_toTopOf="parent"
  tools:srcCompat="@drawable/ic_sleep_5" />

  <TextView
  android:id="@+id/sleep_length"
  android:layout_width="0dp"
  android:layout_height="20dp"
  android:layout_marginStart="8dp"
  android:layout_marginTop="8dp"
  android:layout_marginEnd="16dp"
  app:layout_constraintEnd_toEndOf="parent"
  app:layout_constraintStart_toEndOf="@+id/quality_image"
  app:layout_constraintTop_toTopOf="@+id/quality_image"
  tools:text="Wednesday" />

  <TextView
  android:id="@+id/quality_string"
  android:layout_width="0dp"
  android:layout_height="20dp"
  android:layout_marginTop="8dp"
  app:layout_constraintEnd_toEndOf="@+id/sleep_length"
  app:layout_constraintHorizontal_bias="0.0"
  app:layout_constraintStart_toStartOf="@+id/sleep_length"
  app:layout_constraintTop_toBottomOf="@+id/sleep_length"
  tools:text="Excellent!!!" />
</androidx.constraintlayout.widget.ConstraintLayout>
Step 2: Create ViewHolder
- Open
SleepNightAdapter.kt. Make a class inside theSleepNightAdaptercalledViewHolderand make it extendRecyclerView.ViewHolder.
class ViewHolder(itemView: View) : RecyclerView.ViewHolder(itemView){}- Inside
ViewHolder, get references to the views. You need a reference to the views that thisViewHolderwill update. Every time you bind thisViewHolder, you need to access the image and both text views. (You convert this code to use data binding later.)
val sleepLength: TextView = itemView.findViewById(R.id.sleep_length)
val quality: TextView = itemView.findViewById(R.id.quality_string)
val qualityImage: ImageView = itemView.findViewById(R.id.quality_image)
Step 3: Use the ViewHolder in SleepNightAdapter
- In the
SleepNightAdapterdefinition, instead ofTextItemViewHolder, use theSleepNightAdapter.ViewHolderthat you just created.
class SleepNightAdapter: RecyclerView.Adapter<SleepNightAdapter.ViewHolder>() {}- Update
onCreateViewHolder():
-
Change the signature of
onCreateViewHolder()to return theViewHolder. -
Change the layout inflator to use the correct layout resource,
list_item_sleep_night. -
Remove the cast to
TextView. -
Instead of returning a
TextItemViewHolder, return aViewHolder.
Here is the finished updatedonCreateViewHolder()function:
override fun onCreateViewHolder(
 parent: ViewGroup, viewType: Int): ViewHolder {
 val layoutInflater = LayoutInflater.from(parent.context)
 val view = layoutInflater.inflate(R.layout.list_item_sleep_night, parent, false)
 return ViewHolder(view)
}- Update
onBindViewHolder():
-
Change the signature of
onBindViewHolder()so that theholderparameter is aViewHolderinstead of aTextItemViewHolder. -
Inside
onBindViewHolder(), delete all the code, except for the definition ofitem. -
Define a
valresthat holds a reference to theresourcesfor this view.
val res = holder.itemView.context.resources- Set the text of the
sleepLengthtext view to the duration. Copy the code below, which calls a formatting function that’s provided with the starter code.
holder.sleepLength.text = convertDurationToFormatted(item.startTimeMilli, item.endTimeMilli, res)-
This gives an error, because
convertDurationToFormatted()needs to be defined. OpenUtil.ktand uncomment the code and associated imports for it. (Select Code > Comment with Line comments.) -
Back in
onBindViewHolder(), useconvertNumericQualityToString()to set the quality.
holder.quality.text= convertNumericQualityToString(item.sleepQuality, res)- You may need to manually import these functions.
import com.example.android.trackmysleepquality.convertDurationToFormatted
import com.example.android.trackmysleepquality.convertNumericQualityToString- Set the correct icon for the quality. The new
ic_sleep_activeicon is provided for you in the starter code.
holder.qualityImage.setImageResource(when (item.sleepQuality) {
  0 -> R.drawable.ic_sleep_0
  1 -> R.drawable.ic_sleep_1
  2 -> R.drawable.ic_sleep_2
  3 -> R.drawable.ic_sleep_3
  4 -> R.drawable.ic_sleep_4
  5 -> R.drawable.ic_sleep_5
  else -> R.drawable.ic_sleep_active
})
Here is the finished updated onBindViewHolder() function, setting all the data for the ViewHolder:
override fun onBindViewHolder(holder: ViewHolder, position: Int) {
 val item = data[position]
 val res = holder.itemView.context.resources
 holder.sleepLength.text = convertDurationToFormatted(item.startTimeMilli, item.endTimeMilli, res)
 holder.quality.text = convertNumericQualityToString(item.sleepQuality, res)
 holder.qualityImage.setImageResource(when (item.sleepQuality) {
 0 -> R.drawable.ic_sleep_0
 1 -> R.drawable.ic_sleep_1
 2 -> R.drawable.ic_sleep_2
 3 -> R.drawable.ic_sleep_3
 4 -> R.drawable.ic_sleep_4
 5 -> R.drawable.ic_sleep_5
 else -> R.drawable.ic_sleep_active
 })
}
Refactor onBindViewHolder
Your RecyclerView is now complete! You learned how to implement an Adapter and a ViewHolder, and you put them together to display a list with a RecyclerView Adapter.
Your code so far shows the process of creating an adapter and view holder. However, you can improve this code. The code to display and the code to manage view holders is mixed up, and onBindViewHolder() knows details about how to update the ViewHolder.
In a production app, you might have multiple view holders, more complex adapters, and multiple developers making changes. You should structure your code so that everything related to a view holder is only in the view holder.
Step 1: Refactor onBindViewHolder()
In this step, you refactor the code and move all the view holder functionality into the ViewHolder. The purpose of this refactoring is not to change how the app looks to the user, but make it easier and safer for developers to work on the code. Fortunately, Android Studio has tools to help.
- In
SleepNightAdapter, inonBindViewHolder(), select everything except the statement to declare the variableitem. - Right-click, then select Refactor > Extract > Function.
- Name the function
bindand accept the suggested parameters. Click OK. Thebind()function is placed belowonBindViewHolder().
private fun bind(holder: ViewHolder, item: SleepNight) {
 val res = holder.itemView.context.resources
 holder.sleepLength.text = convertDurationToFormatted(item.startTimeMilli, item.endTimeMilli, res)
 holder.quality.text = convertNumericQualityToString(item.sleepQuality, res)
 holder.qualityImage.setImageResource(when (item.sleepQuality) {
 0 -> R.drawable.ic_sleep_0
 1 -> R.drawable.ic_sleep_1
 2 -> R.drawable.ic_sleep_2
 3 -> R.drawable.ic_sleep_3
 4 -> R.drawable.ic_sleep_4
 5 -> R.drawable.ic_sleep_5
 else -> R.drawable.ic_sleep_active
 })
}- Put the cursor on the word
holderof theholderparameter ofbind(). PressAlt+Enter(Option+Enteron a Mac) to open the intention menu. Select Convert parameter to receiver to convert this to an extension function that has the following signature:
private fun ViewHolder.bind(item: SleepNight) {...}- Cut and paste the
bind()function into theViewHolder. - Make
bind()public. - Import
bind()into the adapter, if necessary. - Because it’s now in the
ViewHolder, you can remove theViewHolderpart of the signature. Here is the final code for thebind()function in theViewHolderclass.
fun bind(item: SleepNight) {
  val res = itemView.context.resources
  sleepLength.text = convertDurationToFormatted(
  item.startTimeMilli, item.endTimeMilli, res)
  quality.text = convertNumericQualityToString(
  item.sleepQuality, res)
  qualityImage.setImageResource(when (item.sleepQuality) {
  0 -> R.drawable.ic_sleep_0
  1 -> R.drawable.ic_sleep_1
  2 -> R.drawable.ic_sleep_2
  3 -> R.drawable.ic_sleep_3
  4 -> R.drawable.ic_sleep_4
  5 -> R.drawable.ic_sleep_5
  else -> R.drawable.ic_sleep_active
  })
}
Step 2: Refactor onCreateViewHolder
The onCreateViewHolder() method in the adapter currently inflates the view from the layout resource for the ViewHolder. However, inflation has nothing to do with the adapter, and everything to do with the ViewHolder. Inflation should happen in the ViewHolder.
- In
onCreateViewHolder(), select all the code in the body of the function. Right-click, then select Refactor > Extract > Function. Name the functionfromand accept the suggested parameters. Click OK. - Put the cursor on the function name
from. PressAlt+Enter(Option+Enteron a Mac) to open the intention menu. Select Move to companion object. Thefrom()function needs to be in a companion object so it can be called on theViewHolderclass, not called on aViewHolderinstance. - Move the
companionobject into theViewHolderclass. - Make
from()public. - In
onCreateViewHolder(), change thereturnstatement to return the result of callingfrom()in theViewHolderclass.
Your completed onCreateViewHolder() and from() methods should look like the code below, and your code should build and run without errors.
override fun onCreateViewHolder(parent: ViewGroup, viewType: Int): ViewHolder {
 return ViewHolder.from(parent)
}
companion object {
fun from(parent: ViewGroup): ViewHolder {
val layoutInflater = LayoutInflater.from(parent.context)
val view = layoutInflater.inflate(R.layout.list_item_sleep_night, parent, false)
return ViewHolder(view)
}
}- Change the signature of the
ViewHolderclass so that the constructor is private. Becausefrom()is now a method that returns a newViewHolderinstance, there’s no reason for anyone to call the constructor ofViewHolderanymore.
class ViewHolder private constructor(itemView: View) : RecyclerView.ViewHolder(itemView){}Improving Data Refresh
Here is a recap of using RecyclerView with the adapter pattern to display sleep data to the user.
-
From user input, the app creates a list of
SleepNightobjects. EachSleepNightobject represents a single night of sleep, its duration, and quality. -
The
SleepNightAdapteradapts the list ofSleepNightobjects into somethingRecyclerViewcan use and display. -
The
SleepNightAdapteradapter producesViewHoldersthat contain the views, data, and meta information for the recycler view to display the data. -
RecyclerViewuses theSleepNightAdapterto determine how many items there are to display (getItemCount()).RecyclerViewusesonCreateViewHolder()andonBindViewHolder()to get view holders bound to data for displaying.
The notifyDataSetChanged() method is inefficient
- To tell
RecyclerViewthat an item in the list has changed and needs to be updated, the current code callsnotifyDataSetChanged()in theSleepNightAdapter, as shown below.
var data = listOf<SleepNight>()
  set(value) {
  field = value
  notifyDataSetChanged()
}-
However,
notifyDataSetChanged()tellsRecyclerViewthat the entire list is potentially invalid. As a result,RecyclerViewrebinds and redraws every item in the list, including items that are not visible on screen. This is a lot of unnecessary work. For large or complex lists, this process could take long enough that the display flickers or stutters as the user scrolls through the list. -
To fix this problem, you can tell
RecyclerViewexactly what has changed.RecyclerViewcan then update only the views that changed on screen. -
RecyclerViewhas a rich API for updating a single element. You could usenotifyItemChanged()to tellRecyclerViewthat an item has changed, and you could use similar functions for items that are added, removed, or moved. You could do it all manually, but that task would be non-trivial and might involve quite a bit of code. Fortunately, there’s a better way.
DiffUtil: an efficient way that does the hard work for you
RecyclerView has a class called DiffUtil which is for calculating the differences between two lists. DiffUtil takes an old list and a new list and figures out what’s different. It finds items that were added, removed, or changed. Then it uses an algorithm called a Eugene W. Myers’s difference algorithm to figure out the minimum number of changes to make from the old list to produce the new list.
Once DiffUtil figures out what has changed, RecyclerView can use that information to update only the items that were changed, added, removed, or moved, which is much more efficient than redoing the entire list.
Refresh Data with DiffUtil
Step 1: Implement SleepNightDiffCallback
In order to use the functionality of the DiffUtil class, extend DiffUtil.ItemCallback.
- Open
SleepNightAdapter.kt. - Below the full class definition for
SleepNightAdapter, make a new top-level class calledSleepNightDiffCallbackthat extendsDiffUtil.ItemCallback. PassSleepNightas a generic parameter.
class SleepNightDiffCallback : DiffUtil.ItemCallback<SleepNight>() {}- Put the cursor in the
SleepNightDiffCallbackclass name. PressAlt+Enter(Option+Enteron Mac) and select Implement Members. In the dialog that opens, shift-left-click to select theareItemsTheSame()andareContentsTheSame()methods, then click OK.
This generates stubs insideSleepNightDiffCallbackfor the two methods, as shown below.DiffUtiluses these two methods to figure out how the list and items have changed.
override fun areItemsTheSame(oldItem: SleepNight, newItem: SleepNight): Boolean {
 TODO("not implemented") //To change body of created functions use File | Settings | File Templates.
}

override fun areContentsTheSame(oldItem: SleepNight, newItem: SleepNight): Boolean {
 TODO("not implemented") //To change body of created functions use File | Settings | File Templates.
}- Inside
areItemsTheSame(), replace theTODOwith code that tests whether the two passed-inSleepNightitems,oldItemandnewItem, are the same. If the items have the samenightId, they are the same item, so returntrue. Otherwise, returnfalse.DiffUtiluses this test to help discover if an item was added, removed, or moved.
override fun areItemsTheSame(oldItem: SleepNight, newItem: SleepNight): Boolean {
  return oldItem.nightId == newItem.nightId
}- Inside
areContentsTheSame(), check whetheroldItemandnewItemcontain the same data; that is, whether they are equal. This equality check will check all the fields, becauseSleepNightis a data class.Dataclasses automatically defineequalsand a few other methods for you. If there are differences betweenoldItemandnewItem, this code tellsDiffUtilthat the item has been updated.
override fun areContentsTheSame(oldItem: SleepNight, newItem: SleepNight): Boolean {
  return oldItem == newItem
}
The full code of SleepNightDiffCallback should be like:
/**
 * Callback for calculating the diff between two non-null items in a list.
 *
 * Used by ListAdapter to calculate the minumum number of changes between and old list and a new
 * list that's been passed to `submitList`.
 */
class SleepNightDiffCallback : DiffUtil.ItemCallback<SleepNight>() {
 override fun areItemsTheSame(oldItem: SleepNight, newItem: SleepNight): Boolean {
 return oldItem.nightId == newItem.nightId
 }

 override fun areContentsTheSame(oldItem: SleepNight, newItem: SleepNight): Boolean {
 return oldItem == newItem
 }
}
Step 2: Change your adapter to extend ListAdapter
It’s a common pattern to use a RecyclerView to display a list that changes. RecyclerView provides an adapter class, ListAdapter, that helps you build a RecyclerView adapter that’s backed by a list.
ListAdapter keeps track of the list for you and notifies the adapter when the list is updated.
- In the
SleepNightAdapter.ktfile, change the class signature ofSleepNightAdapterto extendListAdapter. If prompted, importandroidx.recyclerview.widget.ListAdapter. - Add
SleepNightas the first argument to theListAdapter, beforeSleepNightAdapter.ViewHolder. - Add
SleepNightDiffCallback()as a parameter to the constructor. TheListAdapterwill use this to figure out what changed in the list. Your finishedSleepNightAdapterclass signature should look as shown below.
class SleepNightAdapter : ListAdapter<SleepNight, SleepNightAdapter.ViewHolder>(SleepNightDiffCallback()) {}- Inside the
SleepNightAdapterclass, delete thedatafield, including the setter. You don’t need it anymore, becauseListAdapterkeeps track of the list for you. - Delete the override of
getItemCount(), because theListAdapterimplements this method for you. - To get rid of the error in
onBindViewHolder(), change theitemvariable. Instead of usingdatato get anitem, call thegetItem(position)method that theListAdapterprovides.
val item = getItem(position)Your code needs to tell the ListAdapter when a changed list is available. ListAdapter provides a method called submitList() to tell ListAdapter that a new version of the list is available. When this method is called, the ListAdapter diffs the new list against the old one and detects items that were added, removed, moved, or changed. Then the ListAdapter updates the items shown by RecyclerView.
- Open
SleepTrackerFragment.kt. - In
onCreateView(), in the observer onsleepTrackerViewModel, find the error where thedatavariable that you’ve deleted is referenced. - Replace
adapter.data = itwith a call toadapter.submitList(it). The updated code is shown below.
sleepTrackerViewModel.nights.observe(viewLifecycleOwner, Observer {
  it?.let {
  adapter.submitList(it)
  }
})
Using DataBinding with RecyclerView
With data binding, we can easily observe and show the data to the UI from a data source.
Step 1: Add data binding to the layout file
- Open the
list_item_sleep_night.xmllayout file in the Text tab. - Put the cursor on the
ConstraintLayouttag and pressAlt+Enter(Option+Enteron a Mac). The intention menu (the “quick fix” menu) opens. - Select Convert to data binding layout. This wraps the layout into
<layout>and adds a<data>tag inside. - Scroll back to the top, if necessary, and inside the
<data>tag, declare a variable namedsleep. - Make its
typethe fully qualified name ofSleepNight,com.example.android.trackmysleepquality.database.SleepNight. Your finished<data>tag should look as shown below.
<data>
 <variable
 name="sleep"
 type="com.example.android.trackmysleepquality.database.SleepNight"/>
</data>- To force the creation of the
Bindingobject, select Build > Clean Project, then select Build > Rebuild Project. (If you still have problems, select File > Invalidate Caches / Restart.) TheListItemSleepNightBindingbinding object, along with related code, is added to the project’s generated files.
Step 2: Inflate the item layout using data binding
- Open
SleepNightAdapter.kt. In theViewHolderclass, find theonCreateViewHolder()method. Delete the declaration of theviewvariable.
val view = layoutInflater.inflate(R.layout.list_item_sleep_night, parent, false)- Where the
viewvariable was, define a new variable calledbindingthat inflates theListItemSleepNightBindingbinding object, as shown below. Make the necessary import of the binding object.
val binding =
ListItemSleepNightBinding.inflate(layoutInflater, parent, false)- At the end of the function, instead of returning the
view, returnbinding.
return ViewHolder(binding)- To get rid of the error, place your cursor on the word
binding. PressAlt+Enter(Option+Enteron a Mac) to open the intention menu. Select Change parameter ‘itemView’ type of primary constructor of class ‘ViewHolder’ to ‘ListItemSleepNightBinding’. This updates the parameter type of theViewHolderclass. - Scroll up to the class definition of the
ViewHolderto see the change in the signature. You see an error foritemView, because you changeditemViewtobindingin thefrom()method. In theViewHolderclass definition, right-click on one of the occurrences ofitemViewand select Refactor > Rename. Change the name tobinding. Prefix the constructor parameterbindingwithvalto make it a property. - In the call to the parent class,
RecyclerView.ViewHolder, change the parameter frombindingtobinding.root. You need to pass aView, andbinding.rootis the rootConstraintLayoutin your item layout.
Your finished class declaration should look like the code below.
class ViewHolder private constructor(val binding: ListItemSleepNightBinding) : RecyclerView.ViewHolder(binding.root){}Step 3: Replace findViewById()
You can now update the sleepLength, quality, and qualityImage properties to use the binding object instead of findViewById().
- Change the initializations of
sleepLength,qualityString, andqualityImageto use the views of thebindingobject, as shown below. After this, your code should not show any more errors.
val sleepLength: TextView = binding.sleepLength
val quality: TextView = binding.qualityString
val qualityImage: ImageView = binding.qualityImage
Once your code is compiling you can inline the new definitions. Do this by right clicking on each field, then selecting Refactor > Inline. Select Inline all references and remove the property to tell Android studio to remove the property.
Inline is a very common refactor. It’s worth taking a moment to learn the keyboard shortcut. You can find the keyboard shortcut in the context menu next to Inline.
- Right-click on the
sleepLength,quality, andqualityImageproperty names. Select Refactor > Inline, or pressControl+Command+N(Option+Command+Non a Mac).
Your refactored ViewHolder should now look like this:
class ViewHolder private constructor(val binding: ListItemSleepNightBinding): RecyclerView.ViewHolder(binding.root) {

fun bind(item: SleepNight) {
 val res = itemView.context.resources
 binding.sleepLength.text = convertDurationToFormatted(item.startTimeMilli, item.endTimeMilli, res)
 binding.qualityString.text = convertNumericQualityToString(item.sleepQuality, res)
 binding.qualityImage.setImageResource(when (item.sleepQuality) {
 0 -> R.drawable.ic_sleep_0
 1 -> R.drawable.ic_sleep_1
 2 -> R.drawable.ic_sleep_2
 3 -> R.drawable.ic_sleep_3
 4 -> R.drawable.ic_sleep_4
 5 -> R.drawable.ic_sleep_5
 else -> R.drawable.ic_sleep_active
 })
}

companion object {
 fun from(parent: ViewGroup): ViewHolder {
 val layoutInflater = LayoutInflater.from(parent.context)
 val binding = ListItemSleepNightBinding.inflate(layoutInflater, parent, false)
 return ViewHolder(binding)
 }
}
}
Step 4: Create binding adapters
In a previous lesson, you used the Transformations class to take LiveData and generate formatted strings to display in text views. However, if you need to bind different types, or complex types, you can provide binding adapters to help data binding use those types. Binding adapters are adapters that take your data and adapt it into something that data binding can use to bind a view, like text or an image.
You are going to implement three binding adapters, one for the quality image, and one for each text field. In summary, to declare a binding adapter, you define a method that takes an item and a view, and annotate it with @BindingAdapter. In the body of the method, you implement the transformation. In Kotlin, you can write a binding adapter as an extension function on the view class that receives the data.
Note that you will have to import a number of classes in the step, and it will not be called out individually.
- Open
SleepNightAdapater.kt. Inside theViewHolderclass, find thebind()method and remind yourself what this method does. You will take the code that calculates the values forbinding.sleepLength,binding.quality, andbinding.qualityImage, and use it inside the adapter instead. (For now, leave the code as it is; you move it in a later step.) - In the
sleeptrackerpackage, create and open a file calledBindingUtils.kt. Declare an extension function onTextView, calledsetSleepDurationFormatted, and pass in aSleepNight. This function will be your adapter for calculating and formatting the sleep duration.
fun TextView.setSleepDurationFormatted(item: SleepNight) {}- In the body of
setSleepDurationFormatted, bind the data to the view as you did inViewHolder.bind(). CallconvertDurationToFormatted()and then set thetextof theTextViewto the formatted text. (Because this is an extension function onTextView, you can directly access thetextproperty.)
text = convertDurationToFormatted(item.startTimeMilli, item.endTimeMilli, context.resources)- To tell data binding about this binding adapter, annotate the function with
@BindingAdapter. This function is the adapter for thesleepDurationFormattedattribute, so passsleepDurationFormattedas an argument to@BindingAdapter.
@BindingAdapter("sleepDurationFormatted")- The second adapter sets the sleep quality based on the value in a
SleepNightobject. Create an extension function calledsetSleepQualityString()onTextView, and pass in aSleepNight. In the body, bind the data to the view as you did inViewHolder.bind(). CallconvertNumericQualityToStringand set thetext. Annotate the function with@BindingAdapter("sleepQualityString").
@BindingAdapter("sleepQualityString")
fun TextView.setSleepQualityString(item: SleepNight) {
  text = convertNumericQualityToString(item.sleepQuality, context.resources)
}- The third binding adapter sets the image on an image view. Create the extension function on
ImageView, callsetSleepImage, and use the code fromViewHolder.bind(), as shown below.
@BindingAdapter("sleepImage")
fun ImageView.setSleepImage(item: SleepNight) {
  setImageResource(when (item.sleepQuality) {
  0 -> R.drawable.ic_sleep_0
  1 -> R.drawable.ic_sleep_1
  2 -> R.drawable.ic_sleep_2
  3 -> R.drawable.ic_sleep_3
  4 -> R.drawable.ic_sleep_4
  5 -> R.drawable.ic_sleep_5
  else -> R.drawable.ic_sleep_active
  })
}
Step 5: Update SleepNightAdapter
- Open
SleepNightAdapter.kt. Delete everything in thebind()method, because you can now use data binding and your new adapters to do this work for you. - Inside
bind(), assign sleep toitem, because you need tell the binding object about your newSleepNight. - Below that line, add
binding.executePendingBindings(). This call is an optimization that asks data binding to execute any pending bindings right away. It’s always a good idea to callexecutePendingBindings()when you use binding adapters in aRecyclerView, because it can slightly speed up sizing the views.
fun bind(item: SleepNight) {
 binding.sleep = item
 binding.executePendingBindings()
}
Step 6: Add bindings to XML layout
- Open
list_item_sleep_night.xml. In theImageView, add anappproperty with the same name as the binding adapter that sets the image. Pass in thesleepvariable, as shown below. This property creates the connection between the view and the binding object, via the adapter. WheneversleepImageis referenced, the adapter will adapt the data from theSleepNight.
app:sleepImage="@{sleep}"- Do the same for the
sleep_lengthand thequality_stringtext views. WheneversleepDurationFormattedorsleepQualityStringare referenced, the adapters will adapt the data from theSleepNight.
app:sleepDurationFormatted="@{sleep}"app:sleepQualityString="@{sleep}"- Run your app. It works exactly the same as it did before. The binding adapters take care of all the work of formatting and updating the views as the data changes, simplifying the
ViewHolderand giving the code much better structure than it had before.
You’ve displayed the same list for the last few exercises. That’s by design, to show you that the Adapter interface allows you to architect your code in many different ways. The more complex your code, the more important it becomes to architect it well. In production apps, these patterns and others are used with RecyclerView. The patterns all work, and each has its benefits. Which one you choose depends on what you are building.
Using GridLayout
Layouts and LayoutManagers
In a previous task, when you added the RecyclerView to fragment_sleep_tracker.xml, you added a LinearLayoutManager without any customizations. This code displays the data as a vertical list.
app:layoutManager="androidx.recyclerview.widget.LinearLayoutManager"LinearLayoutManager is the most common and straightforward layout manager for RecyclerView, and it supports both horizontal and vertical placement of child views. For example, you could use LinearLayoutManager to create a carousel of images that the user scrolls horizontally.
GridLayout
Another common use case is needing to show a lot of data to the user, which you can do using GridLayout. The GridLayoutManager for RecyclerView lays out the data as a scrollable grid, as shown below.
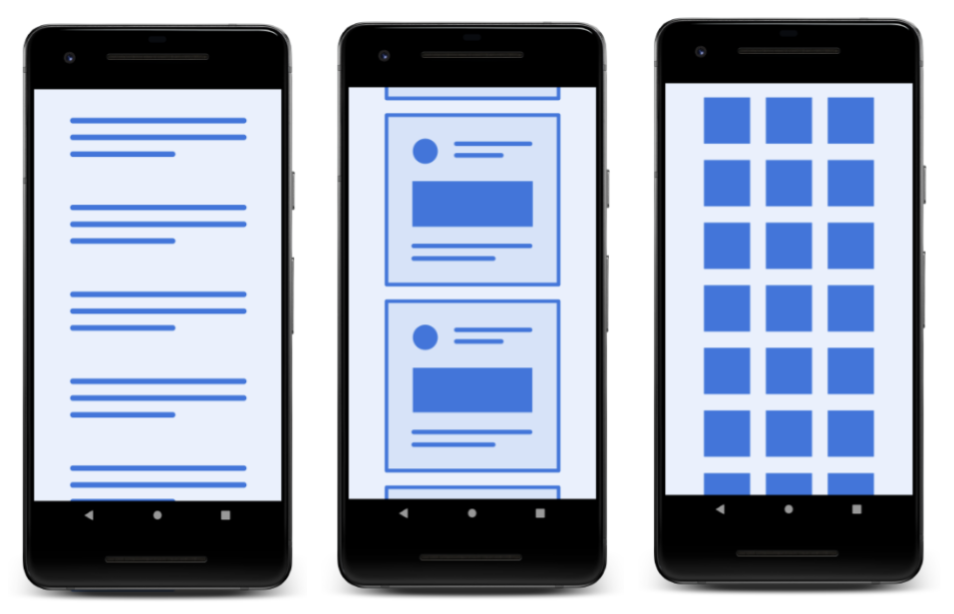
From a design perspective, GridLayout is best for lists that can be represented as icons or images, such as lists within a photo browsing app. In the sleep-tracker app, you could show each night of sleep as a grid of large icons. This design would give the user an overview of their sleep quality at a glance.
How GridLayout lays out items
GridLayout arranges items in a grid of rows and columns. Assuming vertical scrolling, by default, each item in a row takes up one “span.” (In this case, one span is equivalent to the width of one column.)
In the first two examples shown below, each row is made up of three spans. By default, the GridLayoutManager lays out each item in one span until the span count, which you specify. When it reaches the span count, it wraps to the next line.
By default, each item takes up one span, but you can make an item wider by specifying how many spans it is to occupy. For example, the top item in the rightmost screen (shown below) takes up three spans.
Tip:
Span can mean either “row” or “column.” With
GridLayoutManager, you usespanCountto indicate how many columns or rows a grid has, and also how much grid space an item takes up horizontally or vertically.
When you create aGridLayoutManager, you specify the orientation separately from the number of spans, and “span” is “direction-agnostic.” In a (default) vertical configuration, “span” and “column” are equivalent.
Change LinearLayout to GridLayout
Step 1: Change the LayoutManager
- Open the
fragment_sleep_tracker.xmllayout file. Remove the layout manager from thesleep_listRecyclerViewdefinition.
app:layoutManager="androidx.recyclerview.widget.LinearLayoutManager- Open
SleepTrackerFragment.kt. InOnCreateView(), just before thereturnstatement, create a new vertical, top-to-bottomGridLayoutManagerwith 3 spans.
The GridLayoutManager constructor takes up to four arguments: a context, which is the activity, the number spans (columns, in the default vertical layout), an orientation (default is vertical), and whether it’s a reverse layout (default is false).
val manager = GridLayoutManager(activity, 3)- Below that line, tell the
RecyclerViewto use thisGridLayoutManager. TheRecyclerViewis in the binding object and is calledsleepList. (Seefragment_sleep_tracker.xml.)
binding.sleepList.layoutManager = managerStep 2: Change the layout
The current layout in list_item_sleep_night.xml displays the data by using a whole row per night. In this step, you define a more compact square item layout for the grid.
Tip: If you don’t want to lose your current layout, make a copy of the file first and name it list_item_sleep_night_linear.xml, or comment out the code instead of removing it.
- Open
list_item_sleep_night.xml. Delete thesleep_lengthTextView, because the new design doesn’t need it. - Move the
quality_stringTextViewso that it displays beneath theImageView. To do that, you have to update quite a few things. Here is the final layout for thequality_stringTextViewandquality_imageImageView:
<?xml version="1.0" encoding="utf-8"?>

<layout xmlns:android="http://schemas.android.com/apk/res/android"
 xmlns:app="http://schemas.android.com/apk/res-auto"
 xmlns:tools="http://schemas.android.com/tools">

 <data>

 <variable
 name="sleep"
 type="com.example.android.trackmysleepquality.database.SleepNight" />

 </data>

 <androidx.constraintlayout.widget.ConstraintLayout
 android:layout_width="match_parent"
 android:layout_height="wrap_content"
 android:orientation="vertical">

 <ImageView
 android:id="@+id/quality_image"
 android:layout_width="@dimen/icon_size"
 android:layout_height="60dp"
 android:layout_marginStart="16dp"
 android:layout_marginTop="8dp"
 android:layout_marginBottom="8dp"
 app:layout_constraintBottom_toBottomOf="parent"
 app:layout_constraintStart_toStartOf="parent"
 app:layout_constraintTop_toTopOf="parent"
 tools:srcCompat="@drawable/ic_sleep_5"
 app:sleepImage="@{sleep}"/>

 <TextView
 android:id="@+id/quality_string"
 android:layout_width="0dp"
 android:layout_height="wrap_content"
 android:layout_marginTop="8dp"
 app:layout_constraintEnd_toEndOf="@+id/quality_image"
 app:layout_constraintStart_toStartOf="@+id/quality_image"
 app:layout_constraintTop_toBottomOf="@+id/quality_image"
 app:sleepQualityString="@{sleep}"/>

 </androidx.constraintlayout.widget.ConstraintLayout>
</layout>- Verify in the Design view that the
quality_stringTextViewis positioned below theImageView.
Because you used data binding, you don’t need to change anything in the Adapter. The code should just work, and your list should display as a grid.
- Run the app and observe how the sleep data is displayed in a grid.
Note that the ConstraintLayout still takes the entire width. The GridLayoutManager gives your view a fixed width, based on its span. GridLayoutManager does its best to meet all constraints when laying out the grid, adding whitespace or clipping items.
- In
SleepTrackerFragment, in the code that creates theGridLayoutManager, change the number of spans forGridLayoutMangerto 1. Run the app, and you get a list.
val manager = GridLayoutManager(activity, 1)- Change the number of spans for
GridLayoutManagerto 10 and run the app. Notice that theGridLayoutManagerwill fit 10 items in a row, but the items are now clipped. - Change the span count to 5 and the direction to
GridLayoutManager.HORIZONTAL. Run the app and notice how you can scroll horizontally. You would need a different layout to make this look good.
val manager = GridLayoutManager(activity, 5, GridLayoutManager.HORIZONTAL, false)- Don’t forget to set the span count back to 3 and the orientation to vertical!
Interacting with List Items
Receiving clicks and handling them is a two-part task: First, you need to listen to and receive the click and determine which item has been clicked. Then, you need to respond to the click with an action.
So, what is the best place for adding a click listener for this app?
-
The
SleepTrackerFragmenthosts many views, and so listening to click events at the fragment level won’t tell you which item was clicked. It won’t even tell you whether it was an item that was clicked or one of the other UI elements. -
Listening at the
RecyclerViewlevel, it’s hard to figure out exactly what item in the list the user clicked on. -
The best pace to get information about one clicked item is in the
ViewHolderobject, since it represents one list item.
While the ViewHolder is a great place to listen for clicks, it’s not usually the right place to handle them. So, what is the best place for handling the clicks?
-
The
Adapterdisplays data items in views, so you could handle clicks in the adapter. However, the adapter’s job is to adapt data for display, not deal with app logic. -
You should usually handle clicks in the
ViewModel, because theViewModelhas access to the data and logic for determining what needs to happen in response to the click.
Tip: There are other patterns for implementing click listeners in RecyclerViews, but the one you work with in this lesson is easier to explain and more straightforward to implement. As you work on Android apps, you’ll encounter different patterns for using click listeners in RecyclerViews. All the patterns have their advantages.
Step 1: Create a click listener and trigger it from the item layout
- In the
sleeptrackerfolder, open SleepNightAdapter.kt. At the end of the file, at the top level, create a new listener class,SleepNightListener.
class SleepNightListener() { }- Inside the
SleepNightListenerclass, add anonClick()function. When the view that displays a list item is clicked, the view calls thisonClick()function. (You will set theandroid:onClickproperty of the view later to this function.) - Add a function argument
nightof typeSleepNighttoonClick(). The view knows what item it is displaying, and that information needs to be passed on for handling the click. - To define what
onClick()does, provide aclickListenercallback in the constructor ofSleepNightListenerand assign it toonClick(). Giving the lambda that handles the click a name,clickListener, helps keep track of it as it is passed between classes. TheclickListenercallback only needs thenight.nightIdto access data from the database. Your finishedSleepNightListenerclass should look like the code below.
class SleepNightListener(val clickListener: (sleepId: Long) -> Unit) {
  fun onClick(night: SleepNight) = clickListener(night.nightId)
}- Open list_item_sleep_night.xml.. Inside the
datablock, add a new variable to make theSleepNightListenerclass available through data binding. Give the new<variable>anameofclickListener.Set thetypeto the fully qualified name of the classcom.example.android.trackmysleepquality.sleeptracker.SleepNightListener, as shown below. You can now access theonClick()function inSleepNightListenerfrom this layout.
<variable
 name="clickListener"
type="com.example.android.trackmysleepquality.sleeptracker.SleepNightListener" />- To listen for clicks on any part of this list item, add the
android:onClickattribute to theConstraintLayout. Set the attribute toclickListener.onClick(sleep)using a data binding lambda, as shown below:
android:onClick="@{() -> clickListener.onClick(sleep)}"Step 2: Pass the click listener to the view holder and the binding object
- Open SleepNightAdapter.kt. Modify the constructor of the
SleepNightAdapterclass to receive aval clickListener: SleepNightListener. When the adapter binds theViewHolder, it will need to provide it with this click listener.
class SleepNightAdapter(val clickListener: SleepNightListener): ListAdapter<SleepNight, SleepNightAdapter.ViewHolder>(SleepNightDiffCallback()) {{}}- In
onBindViewHolder(), update the call toholder.bind()to also pass the click listener to theViewHolder. You will get a compiler error because you added a parameter to the function call.
holder.bind(clickListener,getItem(position)!!)- Add the
clickListenerparameter tobind(). To do this, put the cursor on the error, and pressAlt+Enter(Windows) orOption+Enter(Mac) on the error. - Inside the
ViewHolderclass, inside thebind()function, assign the click listener to thebindingobject. You see an error because you need to update the binding object.
fun bind(clickListener: SleepNightListener, item: SleepNight) {
 binding.sleep = item
 binding.clickListener = clickListener
 binding.executePendingBindings()
}- To update data binding, Clean and Rebuild your project. (You may need to invalidate caches as well.) So, you have taken a click listener from the adapter constructor, and passed it all the way to the view holder and into the binding object.
Step 3: Display a toast when an item is tapped
You now have the code in place to capture a click, but you haven’t implemented what happens when a list item is tapped. The simplest response is to display a toast showing the nightId when an item is clicked. This verifies that when a list item is clicked, the correct nightId is captured and passed on.
- Open SleepTrackerFragment.kt. In
onCreateView(), find theadaptervariable. Notice that it shows an error, because it now expects a click listener parameter. - Define a click listener by passing in a lambda to the
SleepNightAdapter. This simple lambda just displays a toast showing thenightId, as shown below. You’ll have to importToast. Below is the complete updated definition.
val adapter = SleepNightAdapter(SleepNightListener { nightId -> Toast.makeText(context, "${nightId}", Toast.LENGTH_LONG).show()})- Run the app, tap items, and verify that they display a toast with the correct
nightId. Because items have increasingnightIdvalues, and the app displays the most recent night first, the item with the lowestnightIdis at the bottom of the list.
Navigate on Click
In this task, you change the behavior when an item in the RecyclerView is clicked, so that instead of showing a toast, the app will navigate to a detail fragment that shows more information about the clicked night.
Before starting, open fragment_sleep_detail.xml and uncomment the code inside the ConstraintLayout.
Step 1: Navigate on click
In this step, instead of just displaying a toast, you change the click listener lambda in onCreateView() of the SleepTrackerFragment to pass the nightId to the SleepTrackerViewModel and trigger navigation to the SleepDetailFragment.
Define the click handler function
- Open SleepTrackerViewModel.kt. Inside
SleepTrackerViewModel, towards the end, define theonSleepNightClicked()click handler function. - Inside the
onSleepNightClicked(), trigger navigation by setting_navigateToSleepDetailto the passed inidof the clicked sleep night.
fun onSleepNightClicked(id: Long) {
  _navigateToSleepDetail.value = id
}- Implement
_navigateToSleepDetail. As you’ve done before, define aprivate MutableLiveDatafor the navigation state. And a public gettablevalto go with it.
private val _navigateToSleepDetail = MutableLiveData<Long>()
val navigateToSleepDetail
get() = _navigateToSleepDetail- Define the method to call after the app has finished navigating. Call it
onSleepDetailNavigated()and set its value tonull.
fun onSleepDetailNavigated() {
 _navigateToSleepDetail.value = null
}
Add the code to call the click handler
- Open SleepTrackerFragment.kt and scroll down to the code that creates the adapter and defines
SleepNightListenerto show a toast.
val adapter = SleepNightAdapter(SleepNightListener { nightId ->
  Toast.makeText(context, "${nightId}", Toast.LENGTH_LONG).show()
})- Add the following code below the toast to call a click handler,
onSleepNightClicked(), in thesleepTrackerViewModelwhen an item is tapped. Pass in thenightId, so the view model knows which sleep night to get. This leaves you with an error, because you haven’t definedonSleepNightClicked()yet. You can keep, comment out, or delete the toast, as you wish.
sleepTrackerViewModel.onSleepNightClicked(nightId)Add the code to observe clicks
Open SleepTrackerFragment.kt. In onCreateView(), right above the declaration of manager, add code to observe the new navigateToSleepDetail LiveData. When navigateToSleepDetail changes, navigate to the SleepDetailFragment, passing in the night, then call onSleepDetailNavigated() afterwards. Since you ‘ve done this before in a previous lesson, here is the code:
sleepTrackerViewModel.navigateToSleepDetail.observe(this, Observer { night ->
 night?.let {
 this.findNavController().navigate(
 SleepTrackerFragmentDirections
 .actionSleepTrackerFragmentToSleepDetailFragment(night))
  sleepTrackerViewModel.onSleepDetailNavigated()
 }
 })
Handle null values in the binding adapters
- Run the app again, in debug mode. Tap an item, and filter the logs to show Errors. It will show a stack trace including something like what’s below.
Caused by: java.lang.IllegalArgumentException: Parameter specified as non-null is null: method kotlin.jvm.internal.Intrinsics.checkParameterIsNotNull, parameter item
-
Unfortunately, the stack trace does not make it obvious where this error is triggered. One disadvantage of data binding is that it can make it harder to debug your code. The app crashes when you click an item, and the only new code is for handling the click.
-
However, it turns out that with this new click-handling mechanism, it is now possible for the binding adapters to get called with a
nullvalue foritem. In particular, when the app starts, theLiveDatastarts asnull, so you need to add null checks to each of the adapters.
- In
BindingUtils.kt, for each of the binding adapters, change the type of theitemargument to nullable, and wrap the body withitem?.let{…}. For example, your adapter forsleepQualityStringwill look like this. Change the other adapters likewise.
@BindingAdapter("sleepQualityString")
fun TextView.setSleepQualityString(item: SleepNight?) {
  item?.let {
  text = convertNumericQualityToString(item.sleepQuality, context.resources)
  }
}
Adding Headers to the RecyclerView
One common example is having headers in your list or grid. A list can have a single header to describe the item content. A list can also have multiple headers to group and separate items in a single list.
RecyclerView doesn’t know anything about your data or what type of layout each item has. The LayoutManager arranges the items on the screen, but the adapter adapts the data to be displayed and passes view holders to the RecyclerView. So you will add the code to create headers in the adapter.
Two ways of adding headers
In RecyclerView, every item in the list corresponds to an index number starting from 0. For example:
[Actual Data] → [Adapter Views]
[0: SleepNight] → [0: SleepNight]
[1: SleepNight] → [1: SleepNight]
[2: SleepNight] → [2: SleepNight]
One way to add headers to a list is to modify your adapter to use a different ViewHolder by checking indexes where your header needs to be shown. The Adapter will be responsible for keeping track of the header. For example, to show a header at the top of the table, you need to return a different ViewHolder for the header while laying out the zero-indexed item. Then all the other items would be mapped with the header offset, as shown below.
[Actual Data] → [Adapter Views]
[0: Header]
[0: SleepNight] → [1: SleepNight]
[1: SleepNight] → [2: SleepNight]
[2: SleepNight] → [3: SleepNight.
Another way to add headers is to modify the backing dataset for your data grid. Since all the data that needs to be displayed is stored in a list, you can modify the list to include items to represent a header. This is a bit simpler to understand, but it requires you to think about how you design your objects, so you can combine the different item types into a single list. Implemented this way, the adapter will display the items passed to it. So the item at position 0 is a header, and the item at position 1 is a SleepNight, which maps directly to what’s on the screen.
[Actual Data] → [Adapter Views]
[0: Header] → [0: Header]
[1: SleepNight] → [1: SleepNight]
[2: SleepNight] → [2: SleepNight]
[3: SleepNight] → [3: SleepNight]
Each methodology has benefits and drawbacks. Changing the dataset doesn’t introduce much change to the rest of the adapter code, and you can add header logic by manipulating the list of data. On the other hand, using a different ViewHolder by checking indexes for headers gives more freedom on the layout of the header. It also lets the adapter handle how data is adapted to the view without modifying the backing data.
In this lesson, you update your RecyclerView to display a header at the start of the list. In this case, your app will use a different ViewHolder for the header than for data items. The app will check the index of the list to determine which ViewHolder to use.
Add a List Header
Step 1: Create a DataItem class
To abstract the type of item and let the adapter just deal with “items”, you can create a data holder class that represents either a SleepNight or a Header. Your dataset will then be a list of data holder items.
- Open SleepNightAdapter.kt. Below the
SleepNightListenerclass, at the top level, define asealedclass calledDataItemthat represents an item of data.
Note:
A sealed class defines a closed type, which means that all subclasses of DataItem must be defined in this file. As a result, the number of subclasses is known to the compiler. It’s not possible for another part of your code to define a new type of DataItem that could break your adapter.
sealed class DataItem { }- Inside the body of the
DataItemclass, define two classes that represent the different types of data items. The first is aSleepNightItem, which is a wrapper around aSleepNight, so it takes a single value calledsleepNight. To make it part of the sealed class, have it extendDataItem.
data class SleepNightItem(val sleepNight: SleepNight): DataItem()- The second class is
Header, to represent a header. Since a header has no actual data, you can declare it as anobject. That means there will only ever be one instance ofHeader. Again, have it extendDataItem.
object Header: DataItem()- Inside
DataItem, at the class level, define anabstractLongproperty namedid. When the adapter usesDiffUtilto determine whether and how an item has changed, theDiffItemCallbackneeds to know the id of each item. You will see an error, becauseSleepNightItemandHeaderneed to override the abstract propertyid.
abstract val id: Long- In
SleepNightItem, overrideidto return thenightId.
override val id = sleepNight.nightId- In
Header, overrideidto returnLong.MIN_VALUE, which is a very, very small number (literally, -2 to the power of 63). So, this will never conflict with anynightIdin existence.
override val id = Long.MIN_VALUEYour finished code should look like this, and your app should build without errors.
sealed class DataItem {
 abstract val id: Long
 data class SleepNightItem(val sleepNight: SleepNight): DataItem() {
 override val id = sleepNight.nightId
 }

 object Header: DataItem() {
 override val id = Long.MIN_VALUE
 }
}
Step 2: Create a ViewHolder for the Header
- Create the layout for the header in a new layout resource file called header.xml that displays a
TextView. There is nothing exciting about this, so here is the code.
<?xml version="1.0" encoding="utf-8"?>
<TextView xmlns:android="http://schemas.android.com/apk/res/android"
 android:id="@+id/text"
 android:layout_width="match_parent"
 android:layout_height="wrap_content"
 android:textAppearance="?android:attr/textAppearanceLarge"
 android:text="Sleep Results"
android:padding="8dp" />- Extract
"Sleep Results"into a string resource and call itheader_text.
<string name="header_text">Sleep Results</string>- In SleepNightAdapter.kt, inside
SleepNightAdapter, above theViewHolderclass, create a newTextViewHolderclass. This class inflates the textview.xml layout, and returns aTextViewHolderinstance. Since you’ve done this before, here is the code, and you’ll have to importViewandR:
class TextViewHolder(view: View): RecyclerView.ViewHolder(view) {
 companion object {
 fun from(parent: ViewGroup): TextViewHolder {
 val layoutInflater = LayoutInflater.from(parent.context)
 val view = layoutInflater.inflate(R.layout.header, parent, false)
 return TextViewHolder(view)
 }
 }
}
Step 3: Update SleepNightAdapter
Next you need to update the declaration of SleepNightAdapter. Instead of only supporting one type of ViewHolder, it needs to be able to use any type of view holder.
Define the types of items
- In
SleepNightAdapter.kt, at the top level, below theimportstatements and aboveSleepNightAdapter, define two constants for the view types.
The RecyclerView will need to distinguish each item’s view type, so that it can correctly assign a view holder to it.
private val ITEM_VIEW_TYPE_HEADER = 0
private val ITEM_VIEW_TYPE_ITEM = 1- Inside the
SleepNightAdapter, create a function to overridegetItemViewType()to return the right header or item constant depending on the type of the current item.
override fun getItemViewType(position: Int): Int {
 return when (getItem(position)) {
 is DataItem.Header -> ITEM_VIEW_TYPE_HEADER
 is DataItem.SleepNightItem -> ITEM_VIEW_TYPE_ITEM
 }
 }
Update the SleepNightAdapter definition
- In the definition of
SleepNightAdapter, update the first argument for theListAdapterfromSleepNighttoDataItem. - In the definition of
SleepNightAdapter, change the second generic argument for theListAdapterfromSleepNightAdapter.ViewHoldertoRecyclerView.ViewHolder. You will see some errors for necessary updates, and your class header should look like shown below.
class SleepNightAdapter(val clickListener: SleepNightListener): ListAdapter<DataItem, RecyclerView.ViewHolder>(SleepNightDiffCallback()) {Update onCreateViewHolder()
- Change the signature of
onCreateViewHolder()to return aRecyclerView.ViewHolder.
override fun onCreateViewHolder(parent: ViewGroup, viewType: Int): RecyclerView.ViewHolder- Expand the implementation of the
onCreateViewHolder()method to test for and return the appropriate view holder for each item type. Your updated method should look like the code below.
override fun onCreateViewHolder(parent: ViewGroup, viewType: Int): RecyclerView.ViewHolder {
 return when (viewType) {
 ITEM_VIEW_TYPE_HEADER -> TextViewHolder.from(parent)
 ITEM_VIEW_TYPE_ITEM -> ViewHolder.from(parent)
 else -> throw ClassCastException("Unknown viewType ${viewType}")
 }
 }
Update onBindViewHolder()
- Change the parameter type of
onBindViewHolder()fromViewHoldertoRecyclerView.ViewHolder.
override fun onBindViewHolder(holder: RecyclerView.ViewHolder, position: Int)- Add a condition to only assign data to the view holder if the holder is a
ViewHolder. - Cast the object type returned by
getItem()toDataItem.SleepNightItem. Your finishedonBindViewHolder()function should look like this.
override fun onBindViewHolder(holder: RecyclerView.ViewHolder, position: Int) {
 when (holder) {
 is ViewHolder -> {
 val nightItem = getItem(position) as DataItem.SleepNightItem
 holder.bind(nightItem.sleepNight, clickListener)
 }
 }
}
Update the diffUtil callbacks
Change the methods in SleepNightDiffCallback to use your new DataItem class instead of the SleepNight. Suppress the lint warning as shown in the code below.
class SleepNightDiffCallback : DiffUtil.ItemCallback<DataItem>() {
 override fun areItemsTheSame(oldItem: DataItem, newItem: DataItem): Boolean {
 return oldItem.id == newItem.id
 }
 @SuppressLint("DiffUtilEquals")
 override fun areContentsTheSame(oldItem: DataItem, newItem: DataItem): Boolean {
 return oldItem == newItem
 }
}
Add and submit the header
- Inside the
SleepNightAdapter, belowonCreateViewHolder(), define a functionaddHeaderAndSubmitList()as shown below. This function takes a list ofSleepNight. Instead of usingsubmitList(), provided by theListAdapter, to submit your list, you will use this function to add a header and then submit the list.
fun addHeaderAndSubmitList(list: List<SleepNight>?) {}- Inside
addHeaderAndSubmitList(), if the passed in list isnull, return just a header, otherwise, attach the header to the head of the list, and then submit the list.
val items = when (list) {
 null -> listOf(DataItem.Header)
 else -> listOf(DataItem.Header) + list.map { DataItem.SleepNightItem(it) }
 }
submitList(items)- Open SleepTrackerFragment.kt and change the call to
submitList()toaddHeaderAndSubmitList().
There are two things that need to be fixed for this app. One is visible, and one is not.
-
The header shows up in the top-left corner, and is not easily distinguishable.
-
It doesn’t matter much for a short list with one header, but you should not do list manipulation in
addHeaderAndSubmitList()on the UI thread. Imagine a list with hundreds of items, multiple headers, and logic to decide where items need to be inserted. This work belongs in a coroutine.
Change addHeaderAndSubmitList() to use coroutines:
- At the top level inside the
SleepNightAdapterclass, define aCoroutineScopewithDispatchers.Default.
private val adapterScope = CoroutineScope(Dispatchers.Default)- In
addHeaderAndSubmitList(), launch a coroutine in theadapterScopeto manipulate the list. Then switch to theDispatchers.Maincontext to submit the list, as shown in the code below.
fun addHeaderAndSubmitList(list: List<SleepNight>?) {
 adapterScope.launch {
 val items = when (list) {
 null -> listOf(DataItem.Header)
 else -> listOf(DataItem.Header) + list.map { DataItem.SleepNightItem(it) }
 }
 withContext(Dispatchers.Main) {
 submitList(items)
 }
 }
}
Extend the header to span across the screen
Currently, the header is the same width as the other items on the grid, taking up one span horizontally and vertically. The whole grid fits three items of one span width horizontally, so the header should use three spans horizontally.
To fix the header width, you need to tell the GridLayoutManager when to span the data across all the columns. You can do this by configuring the SpanSizeLookup on a GridLayoutManager. This is a configuration object that the GridLayoutManager uses to determine how many spans to use for each item in the list.
- Open SleepTrackerFragment.kt. Find the code where you define
manager, towards the end ofonCreateView().
val manager = GridLayoutManager(activity, 3)- Below
manager, definemanager.spanSizeLookup, as shown. You need to make anobjectbecausesetSpanSizeLookupdoesn’t take a lambda. To make anobjectin Kotlin, typeobject : classname, in this caseGridLayoutManager.SpanSizeLookup.
manager.spanSizeLookup = object : GridLayoutManager.SpanSizeLookup() {}-
You might get a compiler error to call the constructor. If you do, open the intention menu with
Option+Enter(Mac) orAlt+Enter(Windows) to apply the constructor call. -
Then you’ll get an error on
objectsaying you need to override methods. Put the cursor onobject, pressOption+Enter(Mac) orAlt+Enter(Windows) to open the intentions menu, then override the methodgetSpanSize(). -
In the body of
getSpanSize(), return the right span size for each position. Position 0 has a span size of 3, and the other positions have a span size of 1. Your completed code should look like the code below:
manager.spanSizeLookup = object : GridLayoutManager.SpanSizeLookup() {
 override fun getSpanSize(position: Int) = when (position) {
 0 -> 3
 else -> 1
 }
}- To improve how your header looks, open header.xml and add this code to the layout file header.xml.
android:textColor="@color/white_text_color"
android:layout_marginStart="16dp"
android:layout_marginTop="16dp"
android:layout_marginEnd="16dp"
android:background="@color/colorAccent"
Summary of Adding Headers
-
A header is generally an item that spans the width of a list and acts as a title or separator. A list can have a single header to describe the item content, or multiple headers to group items and separate items from each other.
-
A
RecyclerViewcan use multiple view holders to accommodate a heterogeneous set of items; for example, headers and list items. -
One way to add headers is to modify your adapter to use a different
ViewHolderby checking indexes where your header needs to be shown. TheAdapteris responsible for keeping track of the header. -
Another way to add headers is to modify the backing dataset (the list) for your data grid, which is what you did in this lesson.
These are the major steps for adding a header:
-
Abstract the data in your list by creating a
DataItemthat can hold a header or data. -
Create a view holder with a layout for the header in the adapter.
-
Update the adapter and its methods to use any kind of
RecyclerView.ViewHolder. -
In
onCreateViewHolder(), return the correct type of view holder for the data item. -
Update
SleepNightDiffCallbackto work with theDataItemclass. -
Create a
addHeaderAndSubmitList()function that uses coroutines to add the header to the dataset and then callssubmitList(). -
Implement
GridLayoutManager.SpanSizeLookup()to make only the header three spans wide.
Summary
RecyclerView fundamentals
-
Displaying a list or grid of data is one of the most common UI tasks in Android.
RecyclerViewis designed to be efficient even when displaying extremely large lists. -
RecyclerViewdoes only the work necessary to process or draw items that are currently visible on the screen. -
When an item scrolls off the screen, its views are recycled. That means the item is filled with new content that scrolls onto the screen.
-
The adapter pattern in software engineering helps an object work together with another API.
RecyclerViewuses an adapter to transform app data into something it can display, without the need for changing how the app stores and processes data.
To display your data in a RecyclerView, you need the following parts:
RecyclerView
- To create an instance of
RecyclerView, define a<RecyclerView>element in the layout file.
LayoutManager
A RecyclerView uses a LayoutManager to organize the layout of the items in the RecyclerView, such as laying them out in a grid or in a linear list.
In the <RecyclerView> in the layout file, set the app:layoutManager attribute to the layout manager (such as LinearLayoutManager or GridLayoutManager).
You can also set the LayoutManager for a RecyclerView programmatically. (This technique is covered in a later codelab.)
Layout for each item
Create a layout for one item of data in an XML layout file.
Adapter
Create an adapter that prepares the data and how it will be displayed in a ViewHolder. Associate the adapter with the RecyclerView.
When RecyclerView runs, it will use the adapter to figure out how to display the data on the screen.
The adapter requires you to implement the following methods:
– getItemCount() to return the number of items.
– onCreateViewHolder() to return the ViewHolder for an item in the list.
– onBindViewHolder() to adapt the data to the views for an item in the list.
ViewHolder
A ViewHolder contains the view information for displaying one item from the item’s layout.
-
The
onBindViewHolder()method in the adapter adapts the data to the views. You always override this method. Typically,onBindViewHolder()inflates the layout for an item, and puts the data in the views in the layout. -
Because the
RecyclerViewknows nothing about the data, theAdapterneeds to inform theRecyclerViewwhen that data changes. UsenotifyDataSetChanged()to notify theAdapterthat the data has changed.
DiffUtil and data binding with RecyclerView
DiffUtil:
-
RecyclerViewhas a class calledDiffUtilwhich is for calculating the differences between two lists. -
DiffUtilhas a class calledItemCallBackthat you extend in order to figure out the difference between two lists. -
In the
ItemCallbackclass, you must override theareItemsTheSame()andareContentsTheSame()methods.
ListAdapter:
-
To get some list management for free, you can use the
ListAdapterclass instead ofRecyclerView.Adapter. However, if you useListAdapteryou have to write your own adapter for other layouts, which is why this codelab shows you how to do it. -
To open the intention menu in Android Studio, place the cursor on any item of code and press
Alt+Enter(Option+Enteron a Mac). This menu is particularly helpful for refactoring code and creating stubs for implementing methods. The menu is context-sensitive, so you need to place cursor exactly to get the correct menu.
Data binding:
- Use data binding in the item layout to bind data to the views.
Binding adapters:
-
You previously used
Transformationsto create strings from data. If you need to bind data of different or complex types, provide binding adapters to help data binding use them. -
To declare a binding adapter, define a method that takes an item and a view, and annotate the method with
@BindingAdapter. In Kotlin, you can write the binding adapter as an extension function on theView. Pass in the name of the property that the adapter adapts. For example:
@BindingAdapter("sleepDurationFormatted")- In the XML layout, set an
appproperty with the same name as the binding adapter. Pass in a variable with the data. For example:
.app:sleepDurationFormatted="@{sleep}"GridLayout with RecyclerView
-
Layout managers manage how the items in the
RecyclerVieware arranged. -
RecyclerViewcomes with out-of-the-box layout managers for common use cases such asLinearLayoutfor horizontal and vertical lists, andGridLayoutfor grids. -
For more complicated use cases, implement a custom
LayoutManager. -
From a design perspective,
GridLayoutis best used for lists of items that can be represented as icons or images. -
GridLayoutarranges items in a grid of rows and columns. Assuming vertical scrolling, each item in a row takes up what’s called a “span.” -
You can customize how many spans an item takes up, creating more interesting grids without the need for a custom layout manager.
-
Create an item layout for one item in the grid, and the layout manager takes care of arranging the items.
-
You can set the
LayoutManagerfor theRecyclerVieweither in the XML layout file that contains the<RecyclerView>element, or programmatically.
Interacting with RecyclerView items
To make items in a RecyclerView respond to clicks, attach click listeners to list items in the ViewHolder, and handle clicks in the ViewModel.
To make items in a RecyclerView respond to clicks, you need to do the following:
- Create a listener class that takes a lambda and assigns it to an
onClick()function.
class SleepNightListener(val clickListener: (sleepId: Long) -> Unit) {
   fun onClick(night: SleepNight) = clickListener(night.nightId)
}- Set the click listener on the view.
android:onClick="@{() -> clickListener.onClick(sleep)}"- Pass the click listener to the adapter constructor, into the view holder, and add it to the binding object.
class SleepNightAdapter(val clickListener: SleepNightListener):
ListAdapter<DataItem, RecyclerView.ViewHolder>(SleepNightDiffCallback()holder.bind(getItem(position)!!, clickListener)binding.clickListener = clickListener- In the fragment that shows the recycler view, where you create the adapter, define a click listener by passing a lambda to the adapter.
val adapter = SleepNightAdapter(SleepNightListener { nightId ->
      sleepTrackerViewModel.onSleepNightClicked(nightId)
})- Implement the click handler in the view model. For clicks on list items, this commonly triggers navigation to a detail fragment.
Headers in RecyclerView
-
A header is generally an item that spans the width of a list and acts as a title or separator. A list can have a single header to describe the item content, or multiple headers to group items and separate items from each other.
-
A
RecyclerViewcan use multiple view holders to accommodate a heterogeneous set of items; for example, headers and list items. -
One way to add headers is to modify your adapter to use a different
ViewHolderby checking indexes where your header needs to be shown. TheAdapteris responsible for keeping track of the header. -
Another way to add headers is to modify the backing dataset (the list) for your data grid, which is what you did in this codelab.
These are the major steps for adding a header:
-
Abstract the data in your list by creating a
DataItemthat can hold a header or data. -
Create a view holder with a layout for the header in the adapter.
-
Update the adapter and its methods to use any kind of
RecyclerView.ViewHolder. -
In
onCreateViewHolder(), return the correct type of view holder for the data item. -
Update
SleepNightDiffCallbackto work with theDataItemclass. -
Create a
addHeaderAndSubmitList()function that uses coroutines to add the header to the dataset and then callssubmitList(). -
Implement
GridLayoutManager.SpanSizeLookup()to make only the header three spans wide.